This is the official guide for Lost Lands 3 The Golden Curse Walkthrough and Achievements. This guide does not mention each time you have to zoom into a location; the screenshots show each zoom scene.
Hidden-object puzzles are referred to as HOPs. This guide does not show screenshots of the HOPs, however, it is mentioned when a HOP is available and the inventory item collected.
Updated on: 01.21.2023
Lost Lands 3 The Golden Curse Walkthrough & Achievements
Find our lost land 3 walkthrough and achievements guide below. Our detailed Lost Land 3 guides are available on our site.
Virtuoso Achievement
The goal of this achievement is to complete this puzzle in less than 70 moves, and we’re going to be way under that mark. However, it’s still a lot of moves, so to save confusion I’m going to list them five moves at a time. It’ll make it much easier for you to follow.

Turn the dials in this order:
L, R, M, L, R
R, M, L, R, M
L, R, R, M, L
R, M, L, R, R
By now your screen should look like this:

If you’re still on track, continue with:
M, R, M, L, M
R, M, R, R, L
L, L, L, L, L
M, L, L, R, R
At this point your screen should look like this:

And then, to wrap it all up:
R, M, R, R, R
R, M, R, M
If you did it all right, then boom! Achievement get!
Skilled Achievement
This is possibly the easiest achievement in the game, because once you know the order you can get it in about 10 seconds. I’ve numbered the buttons like so:

And then all you have to do is press the buttons in this order:
3, 6, 3, 2, 5, 2
Ta-dah! Another achievement get!
Architect Achievement
So this is basically a Hanoi Tower, aka where you have to move a stack of discs from one peg to another without stacking larger discs on top of smaller ones. Once you know the trick to how you move them around it’s not that tough, but this achievement has a 3-minute time limit, so it’s rough for newbies. If you’re not familiar with this sort of puzzle, you might want to have that second person nearby reading these directions aloud to you so you don’t flip between screens and get confused.
The directions will be referring to pegs as R, M, and L, as shown below.

Like before, I’ll give you the directions in chunks — but heads up, the chunks are going to get longer as we go.
Here’s the first set:
M ==> R
M ==> L
R ==> L
M ==> R
L ==> M
L ==> R
M ==> R
By now your screen should look like this:

Next, you’re going to go:
M ==> L
R ==> L
R ==> M
L ==> M
R ==> L
M ==> R
M ==> L
R ==> L
Now you should see this:

Now you’ll do:
M ==> R
L ==>M
L ==> R
M ==> R
L ==> M
R ==> L
R ==> M
L ==> M
L ==> R
M ==> R
M ==> L
R ==> L
M ==> R
L ==> M
L ==> R
M ==> R
You should now be here:

This is the final stretch. You’re going to go:
M ==> L
R ==> L
R ==> M
L ==> M
R ==> L
M ==> R
M ==> L
R ==> L
R ==> M
L ==> M
L ==> R
M ==> R
L ==> M
R ==> L
R ==> M
L ==> M
R ==> L
M ==> R
M ==> L
R ==> L
M ==> R
L ==> M
L ==> R
M ==> R
M ==> L
R ==> L
R ==> M
L ==> M
R ==> L
M ==> R
M ==> L
R ==> L
And now your stack should all be on the left side! If you did this in under 3 minutes, you have your achievement!
Lost Lands 3 The Golden Curse Walkthrough
This guide gives step-by-step solutions for all puzzles that are not random. Please read the instructions in the game for each puzzle.
Around the Druid Valley
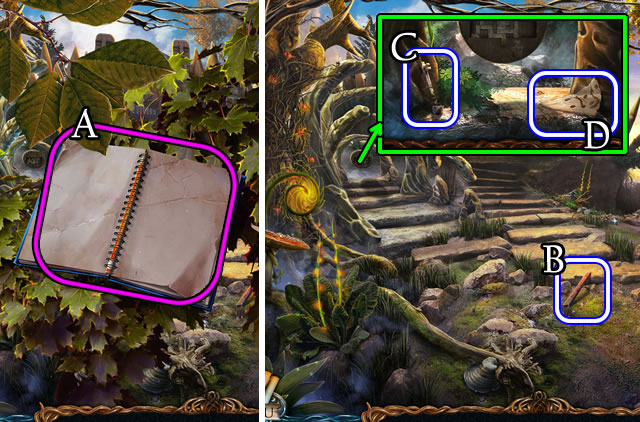
- Uncover and take the Notebook (A). Select the branch.
- Take the HAMMER HANDLE (B).
- Take XYLOPHONE HAMMER 1/3 (C) and MAP FRAGMENT (D).

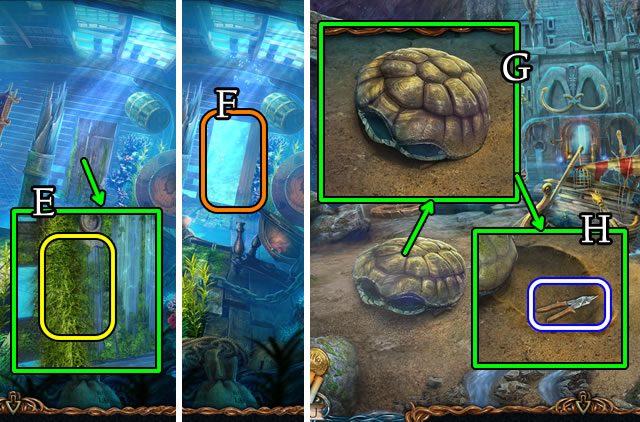
- Take Manuscripts 1/28 (E). Take the HAMMER HEAD (F).
- Combine the HAMMER HEAD and HAMMER HANDLE for a HAMMER (Inventory).
- Select (G). Use the HAMMER for NAILS; take the PLANKS (H).
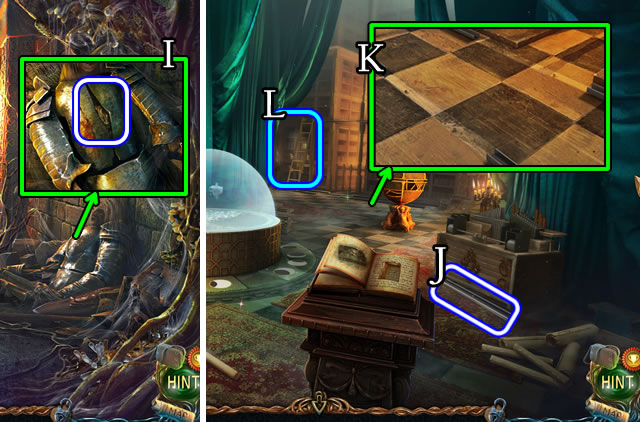
- Take the KNIFE (I) and PICK-AXE HANDLE (J).

- Place the PLANKS and NAILS (K); use the HAMMER.
- Walk forward.
- Select (L); speak to the girl.
- Take Manuscripts 2/28 (M). Take XYLOPHONE HAMMER 2/3 (N).

- Use the KNIFE (O) for a ROPE WITH HOOK (P).
- Place the ROPE WITH HOOK (Q).
- Select the hook (R).

- Touch (S).
- Speak to the girl (T); receive SHEET MUSIC.
- Take the drawing (U). Take XYLOPHONE HAMMER 3/3 and HALF A PAIR OF CLIPPERS (V).
- Walk down.

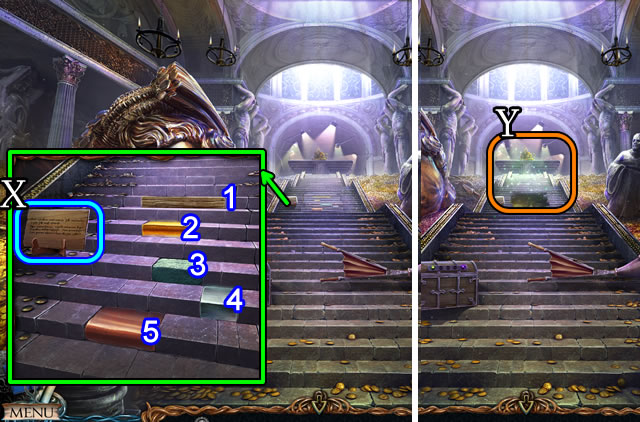
- Place XYLOPHONE HAMMERS 3/3 (W) and the SHEET MUSIC (X).
- Solution (Y). 7-4-2-5-1-3-6-4.
- Walk forward.

- Speak to the grandfather (A).
- Uncover and take Manuscripts 3/28 (B). Take the BRACKETS (C).
- Take the MAP FRAGMENT. Place the BRACKETS (D).

- Solution (E1-E2-E3-E4).

- Grab the HALF A PAIR OF CLIPPERS (F) and BLOODY SPEAR (G).
- Walk down; cross the bridge.
- Combine the two HALF A PAIR OF CLIPPERS for CLIPPERS (Inventory).

- Use the CLIPPERS (H). Take the BUCKET (I).
- Walk down and through the gates.
- Place the BUCKET (J) for a BUCKET OF WATER.
- Return to the Hills.
- Pour the BUCKET OF WATER (K).
- Walk forward.

- Play the HOP (L) to receive OINTMENT.
- Take the CANNONBALL (M) and Manuscripts 4/28 (N).
- Take STONE FEATHERS 1/6 (O).
- Select then take the BROKEN PICK-AXE (P).
- Walk forward.

- Take Manuscripts 5/28 (Q). Grab the GARDEN SHEARS (R).
- Select (S) 3x. Note the inscription.
- Walk forward.

- Grab the SPEAR HEAD (T).
- Combine the BROKEN PICK-AXE, HAMMER and PICK-AXE HANDLE for a PICK-AXE (Inventory).
- Use the PICK-AXE for VOLCANIC CRYSTAL (U).
- Take the CROWBAR (V).
- Walk forward.

- Take the LEVER (W).
- Select (X). Take the BELT (Y), place the CANNONBALL (Z) and LEVER (A). Pull the lever.

- Select (B).
- Solution (C).
- Walk forward.
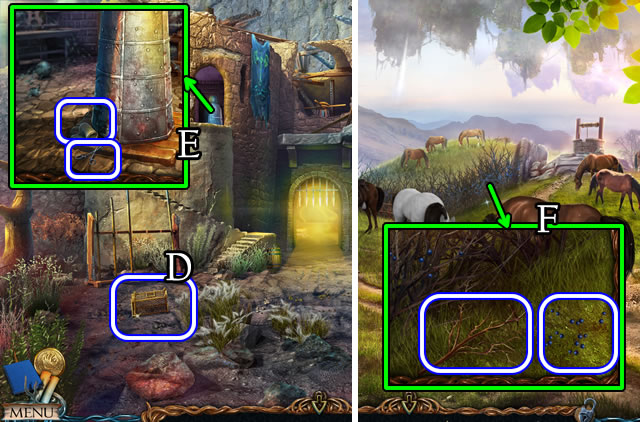
- Grab the CAGE TRAP (D).
- Take the CLAMP and BANDAGE (E).
- Walk down 5x.
- Use the GARDEN SHEARS. Take the BLACKTHORN BERRIES and BLACKTHORN TWIG (F).
- Walk down and through the gates.

- Use the CROWBAR; place the VOLCANIC CRYSTAL (G).
- Walk left.
- Take Manuscripts 6/28 and the MOUSE (H).
- Note the directions; take the FLASK (I).
- Return to the Volcanic Cavern.

- Place the CAGE TRAP; place the MOUSE (J).
- Place the FLASK. Use the CLAMP (K). Take the VIPER VENOM.
- Return to the Relic Repository.

- Place the OINTMENT (L). Add the BLACKTHORN BERRIES, VIPER VENOM and BLOODY SPEAR.
- Take the POTION (M).
- Walk down.

- Place and select the POTION (N).
- Apply the BANDAGE; take the BELT (O). Take the KEY (P).
- Walk left.
- Use the KEY (Q); take STONE FEATHERS 2/6 (R).
- Return to the Arena Entrance.

- Take STONE FEATHERS 3/6 (S).
- Use both BELTS (T); take the LADDER.
- Attempt to go forward (U).
- Place the LADDER (V).
- Take Manuscripts 7/28 (W). Select the wheel.

- Place the SPEAR HEAD (X).
- Take TWO-PRONGED SPEAR 1/2-2/2 (Y).
- Place TWO-PRONGED SPEARS 2/2 (Z).
- Walk forward.

- Grab the CHEWING GUM (A).
- Take Manuscripts 8/28 (B). Take the BATTERY (C).
- Touch (D). Take the MAP FRAGMENT (E). Select and read the diary.
- Walk down 3x.
- Unwrap and select the CHEWING GUM for used CHEWING GUM (Inventory).
- Combine the MAP FRAGMENTS and the CHEWING GUM for a MAP (Inventory).
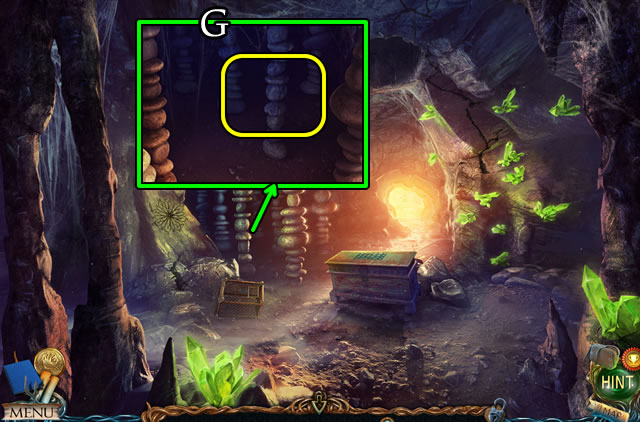
- Place the MAP (G).

- Grab the FULL JERRY CAN (H).
- Remove the cap, place the FULL JERRY CAN and replace the cap (I). Pull the handle 3x (J).

- Play the HOP (K); receive STONE FEATHERS 4/6.
- Use the KNIFE (L), lift the newspaper and take the KEY (M).
- Lift the mattress; take the STONE FIGURINE (N).

- Use the KEY (P).
- Uncover and take the PUZZLE PIECES (Q).

- Solution (R). 1-2-3.
- Place the PUZZLE PIECES (S).

- Solution (T1-T2-T3). (1-A)-(2-B)-(3-C)-(4-D)-(5-E)-(6-F)-(7-G)-(8-H)-(9-I).
- Walk forward.

- Remove the cap (blue), exchange the BATTERY (pink) and replace the cap. Touch the switch (yellow).
- Take the MEDALLION PART (U).
- Take Manuscripts 9/28 (V). Take the MEDALLION PART (W).
- Return to the Druid Village.

- Speak to the grandfather (X). Receive STONE FEATHERS 5/6.
- Walk left.
- Select the hourglass 2x.
- Combine the MEDALLION PARTS for a MEDALLION (Inventory).
- Place the MEDALLION (Y) and select.

- Solution (A1-A2). 6-1-5-4-3-6.
- Take STONE FEATHERS 6/6 (B).
- Return to the Ancient Graveyard.

- Place STONE FEATHERS 6/6 (C).
- Drag the stone piece. (D) Place the STONE FIGURINE (E).
- Take the MASK (F).
- Return to the Relic Repository.

- Place the MASK (G).
- Play the HOP (H) to put on gloves.
- Return to the Arena.
- Pick up the coin (I); receive a CURSED HARPY COIN.
- Return to the Druid Village.
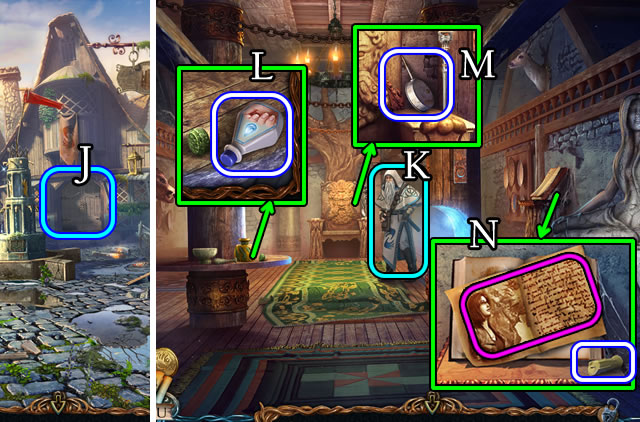
- Open (J) and walk forward.
- Speak to the grandfather (K).
- Take the NAIL POLISH REMOVER (L) and OILCAN (M).
- Take Manuscripts 10/28 and the CANDLE (N). Read the book.
- Walk down and left.

- Place the CANDLE (O); receive a BURNING CANDLE.
- Select (P).
- Place the BURNING CANDLE; take the POWDER FLASK (Q).
- Touch the candle; take the HUMAN FIGURINE (R).
- Walk down 2x.
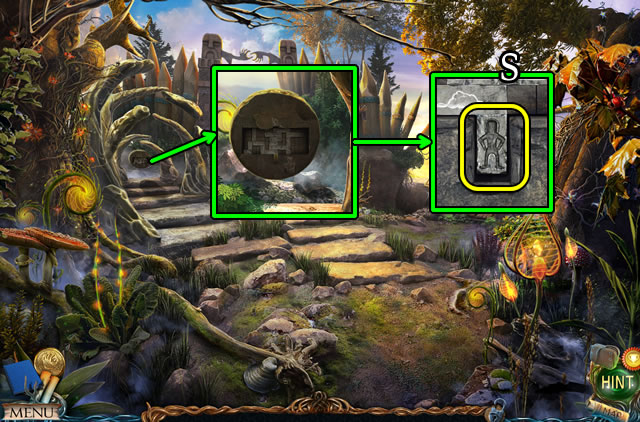
- Place the HUMAN FIGURINE (S).

- Solution (T1-T2-T3). 1-2-3-4-5-6-7-8-9.
Floating Islands Walkthrough

- Uncover and select (U).
- Take Manuscripts 11/28 (V).

- Select (W).
- Touch (X).
- Take the AXE (Y).
- Grab the FIGURINE (Z).
- Return to the Druid Village.

- Place the log (A). Use the AXE 2x.
- Place the piece of wood (B). Use the AXE. Take the FIREWOOD.
- Place the FIGURINE. Take the WINDSOCK (C).
- Return to the Lower Island.
- Touch the WINDSOCK (Inventory); for a NET.

- Use the OILCAN (D). Slide the latch; open the door.
- Use the NET; receive a STAMP (E).
- Return to the Volcanic Crater.
- Place the STAMP (F).
- Open and take the CORE OF FLAMES (G).
- Take Manuscripts 12/28 (H). Read the book.
- Return to the Lower Island.

- Place the CORE OF FLAMES (I).
- Select (J).
- Walk left.

- Take Manuscripts 13/28 (K).
- Take the BROKEN BLADES (L).
- Take the ‘METRONOME’ TILE and TWEEZERS (M).
- Open; take the note and ROPE (N).
- Return to the Relic Repository.

- Use the TWEEZERS (O).
- Take the FIRECRACKER (P).
- Return to the Plains of the Dead.
- Combine the ROPE and NAIL POLISH REMOVER for an ALCOHOL-SOAKED ROPE (Inventory).
- Use the POWDER FLASK; place the ALCOHOL-SOAKED ROPE (Q).
- Place the FIRECRACKER (R).

- Select (S).
- Use the BLACKTHORN TWIG (T).
- Take the MECHANICAL EYE (U).
- Return to the Crossroads.

- Take the DEVICE PART (V).
- Place the DEVICE PART (W).

- Solution (X). C-Ax3-B-C-A-B-C-A-B-C-A-B-Ax4-B-C-B-C-Ax5-B-C-Ax2-B-Cx2-A-B-Ax6-B-A-B-A-B-A-B-A-B-Ax5-B-Ax2-B-Ax7.
- Walk right.

- Speak to the blacksmith (A); give him the BROKEN BLADES.
- Take Manuscripts 14/28 (B).
- Take the POLE HOOK (C).
- Return to Leproch’s Tomb.

- Use the POLE HOOK (D) to receive COAL.
- Return to Anvil Peak.
- Give the COAL (E); receive BLADES.
- Walk down.
- Place the BLADES (F).
- Walk forward.

- Play the HOP (G) to receive a MOTHER FIGURINE.
- Take the YOUNG ROSE BUSH (H).
- Pull the lever (I), place the arrows and release (J).
- Walk forward.

- Speak to the girl (K); receive a HARPY CLAW.
- Take Manuscripts 15/28 (L).
- Walk forward.
- Take the FISH HOOK (M).
- Touch the HARPY CLAW (Inventory); receive a SHOELACE and HARPY CLAW.
- Place the HARPY CLAW (N). Take the LEMON.

- Touch stones (1-2-3).
- Take MANUSCRIPTS 16/28 (O).
- Take the ‘TOWER’ TILE (P).
- Return to Anvil Peak. Speak to the Blacksmith (Q).
- Return to the Druid Village.

- Open the door (R); walk right.
- Take Manuscripts 17/28 (S). Uncover and take the SCRAPER (T).
- Take the FISHING ROD (U).

- Remove the boards; take the FAN (V). Take the WET BOWL (W).
- Open, uncover and take the WRENCH (X).
- Walk down 2x.
- Combine the FISHING ROD and FISH HOOK for a FISHING ROD (Inventory).

- Attempt to take the camera (Y).
- Use the FISHING ROD (Z).
- Select the snapshot (A). Receive a CAMERA.
- Return to the Ancient Graveyard.

- Use the SCRAPER (B) for a DYE SET.
- Return to Leproch’s House.
- Place the DYE SET (C). Use the WRENCH (D).
- Take the FLASK FOR WHITE PAINT and the FLASK FOR BLACK PAINT (E).
- Return to the Lower Island.

- Place the FLASK FOR WHITE PAINT (F); receive FLASK OF CHALK DUST.
- Take the LEVER (G).
- Return to the Elders’ House.
- Move the carpet. Place, then select the LEVER (H).
- Take the METAL BRUSH (I).
- Walk down, then right.

- Place the FIREWOOD and WET BOWL (J). Use the FAN.
- Select the bowl. Place the FLASK FOR BLACK PAINT (K). Use the METAL BRUSH (L); receive a FLASK OF SOOT.
- Use the CAMERA for a PHOTO OF LITTLE MAN (M).
- Return to Island of Exile.

- Place the PHOTO OF LITTLE MAN (N).
- Solution (O).
- Take the METAL WING (P).
- Return to the Relic Repository.

- Place the METAL WING (Q). Select (R) to receive a KEY.
- Use the KEY (S).
- View the note and STONE SLAB (T).
- Return to the Hills.
Underground Walkthrough
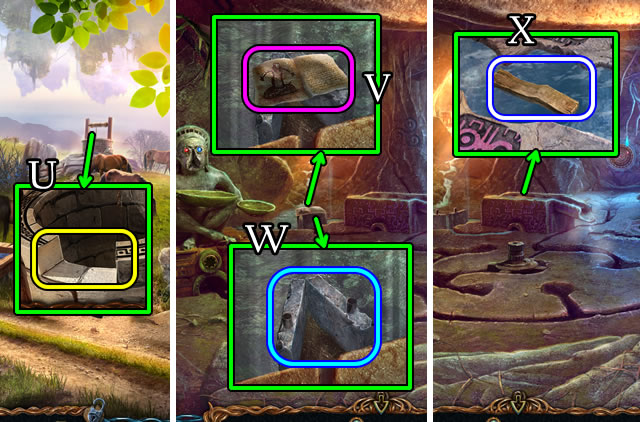
- Place the STONE SLAB (U).
- Climb down the well.
- Take Manuscripts 18/28 (V).
- Touch the stones (W).
- Take STEP 1/4 (X).
- Walk forward.

- Take Manuscripts 19/28 (Y).
- Use the WRENCH (Z). Remove the nut.
- Play the HOP (A); receive BLESSED WATER.

- Use the KNIFE 3x (B); for SUNFLOWERS.
- Take the DOLL (C).
- Touch the DOLL (Inventory) for a PEDAL-KEY and FIORA’S DOLL.
- Place and select the PEDAL-KEY (D).
- Walk left.

- Speak to the woman (E); receive a MAGIC HAMMER.
- Take Manuscripts 20/28 (F).
- Take STEP 2/4 (G).
- Take the FLASK FOR SUNFLOWER OIL (H).
- Return to Anvil Peak.

- Take the SHOVEL (I) and note and diagram (J).
- Return to the Hanging Gardens.

- Use the SHOVEL. Take the CLAY and ‘BALLISTA’ TILE (K).
- Walk forward.
- Give (L) FIORA’S DOLL; receive BLACKSMITH’S PINCERS.
- Return to Anvil Peak.
- Touch the CLAY (Inventory); combine it with the HARPY CLAW for a CLAY FORM.

- Place the CURSED HARPY COIN (M).
- Place the CLAY FORM (N), insert the wire (O) and select the form.
- Touch the bellows 3x (P).

- Select the crucible (Q).
- Use the BLACKSMITH’S PINCERS (R) for a NIPPER WITH A CAST.
- Remove the snow. Place the NIPPER WITH A CAST (S).
- Take the PLIERS (T). Use the HAMMER (U).
- Take the GOLDEN CLAW CASTING.
- Combine the GOLDEN CLAW CASTING and PLIERS for a GOLDEN CLAW CASTING (Inventory).

- Place the GOLDEN CLAW CASTING (V). Use the MAGIC HAMMER. Take a GOLDEN CLAW (W).
- Combine the GOLDEN CLAW with the SHOELACE for a GOLDEN HARPY CLAW (Inventory).
- Return to the Tavern.

- Place the SUNFLOWERS (A) and FLASK FOR SUNFLOWER OIL (B). Select (C) for SUNFLOWER OIL.
- Return to Leproch’s House.

- Place the FLASK OF CHALK DUST and the FLASK OF SOOT (D).
- Add the SUNFLOWER OIL.
- Place the DYE SET (D1).

- Solution (D1). (1-BLx2)-(2-BL,R)-(3-BL,W)-(4-BL,Y)-(5-Rx2)-(6-R,Y)-(7-R,BK)-(8-Yx2)-(9-BKx2)-(10-Wx2).
- Take the PAINT SET (E).
- Place the GOLDEN HARPY CLAW (F); receive a FAKE HARPY CLAW.
- Return to the Island of Exile.

- Place the FAKE HARPY CLAW (G).
- Speak to Fiora (H).
- Take the PAPER CLIP (I).
- Return to Leproch’s House.
- Touch the PAPER CLIP 4x (Inventory) for an UNBENT PAPER CLIP.

- Use the UNBENT PAPER CLIP (J).
- Take the FIRE HOSE and FLINT STONE (K).
- Return to the Island of Exile.
- Combine the LEMON and KNIFE for a HALF A LEMON (Inventory).
- Use HALF A LEMON (L); receive a GEAR.

- Place the GEAR (M) and pull (N).
- Place and select the FIRE HOSE (O).

- Select (P-Q).
- Touch (R).
- Take the BRUSH (S).
- Return to the Ancient Graveyard.

- Replace the bush with the YOUNG ROSE BUSH; use the BLESSED WATER.
- Take the BUTTON (@).
- Select the rose (T); take ROSE PETALS.
- Place the PAINT SET and BRUSH (U).

- Solution (U1).
- Take the TNT (V).
- Return to the Island of Exile.

- Place the TNT (W).
- Use the FLINT STONE (X) and KNIFE.
- Walk forward.
- Take MAARON’S STAFF (Y).
- Return to the Elders’ House.

- Give MAARON’S STAFF (Z); receive a DRAGON FIGURINE.
- Return to the Cave.
- Place the DRAGON FIGURINE (A).
- Solution (B).
- Walk forward.

- Play the HOP (C) for a CAULDRON.
- Walk left.
- Use the KNIFE (D).
- Touch (E).
- Touch (F).

- Take (G), then place the STEERING WHEEL (H).
- Take the DOOR (I) and Manuscripts 21/28 (J).

- Place the DOOR (K).
- Take the LONG LOG (L).
- Walk down 2x and forward.
- Place the CAULDRON for a CAULDRON OF WATER (M).
- Climb the steps.

- Place the rocks 1-2-3 (N).
- Take the SILK HEADSCARF and STEP 3/4 (O).
- Return to Anvil Peak.

- Place the BUTTON (P).
- Solution (P1). 5-3-7-2-4-6-1.

- Take the ‘ANVIL’ TILE and SNOW SHOES (Q).
- Return to the Volcanic Crater.
- Place the SNOW SHOES (R).
- Take the PACKAGE OF NYLONS and STEP 4/4 (S).
- Return to the Fisherman’s Hut.

- Place the STEPS 4/4 (T).
- Play the HOP (U) for a MECHANICAL EYE.
- Return to the Arena.
- Take SOLIDUS’S CURSED KNUCKLES (V), the CURSED MINOTAUR AMULET (W) and GOLD MASK (X).
- Walk down.

- Place each MECHANICAL EYE and the GOLD MASK (A).
- Take the STACKING TOY (B) and TILE-KEY (C).
- Return to the CAVE.

- Place, then select SOLIDUS’S CURSED KNUCKLES (D).
- Walk forward.
- Place the TILE-KEY (E).
- Take the GLUE FORMULA (F).
- Return to the Fisherman’s Hut.

- Speak to the woman (G); receive SCISSORS.
- Return to the Hills.
- Use the SCISSORS for HORSE’S MANE 1/3-2/3-3/3 (H-I-J).
- Return to the Hanging Gardens.

- Place the LONG LOG (K).
- Use the KNIFE to get CORKWOOD BARK (L).
- Return to the Fisherman’s Hut.
- Give HORSE’S MANE 3/3 and CORKWOOD BARK (M). Receive an AXIS PIN.
- Walk down.
- Place the AXIS PIN (N).
- Move the branches; take the FLASK (O).
- Take the BROKEN MILLSTONE DISK (P) and WOODEN BOARDS (Q).
- Return to Anvil Peak.

- Give the BROKEN MILLSTONE DISK (R); receive a CHISEL.
- Return to the Plains of the Dead.
- Open and select the PACKAGE OF NYLONS for NYLON STOCKINGS (Inventory).
- Combine the WOODEN BOARDS, NYLON STOCKINGS and KNIFE for a HOMEMADE LEVER (Inventory).
- Place the HOMEMADE LEVER (S). Select 2x. Take the HOOK’S BLADE (T).
- Use the CHISEL and HAMMER; take a HORSESHOE (U).
- Return to Anvil Peak.
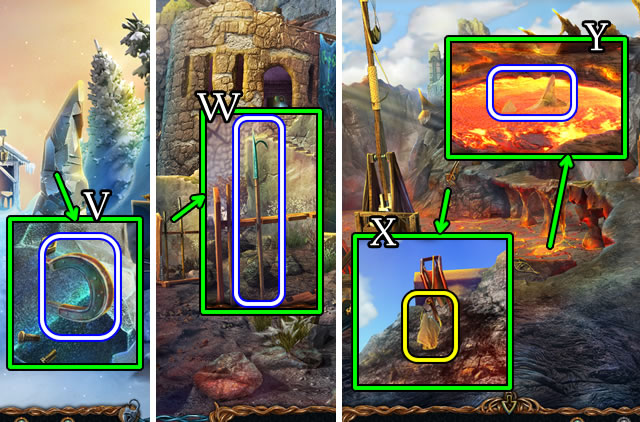
- Place the HORSESHOE (V). Take a MAGNETIZED HORSESHOE.
- Return to the Arena Entrance.
- Combine the HOOK’S BLADE and HAMMER for a HOOK (Inventory).
- Place the HOOK; take a POLE HOOK (W).
- Walk down.
- Use the POLE HOOK for a GLOVE and PIECE OF A GLOBE (X).
- Combine the MAGNETIZED HORSESHOE and GLOVE for an ENCHANTED HORSESHOE WITH GLOVE (Inventory).
- Use the ENCHANTED HORSESHOE GLOVE for a CHAIN-MAIL FISH (Y).
- Return to Anvil Peak.

- Give the CHAIN-MAIL FISH (Z). Receive a FIXED MILLSTONE DISK.
- Return to the Schooner Wreckage.
- Untie the FLASK (Inventory) for a note and FLASK FOR ELIXIR.
- Open the hatch.
- Place the FLASK FOR ELIXIR (A); receive a FLASK OF LAKE WATER.
- Walk down 2x.
- Place the FLASK OF LAKE WATER (B); receive a POTION FLASK.
- Return to the Elders’ House.
- Place the POTION FLASK (C) for an ELIXIR OF WATERBREATHING.
- Return to the Schooner Wreckage.

- Place the ELIXIR FOR WATERBREATHING (D).
- Take Manuscripts 22/28 (E). Take the PIRATE HOOK (F).
- Use the PIRATE HOOK (G).

- Take the BOTTLE WITH A LETTER (H).
- Open and take the FISH (I).
- Unlatch and place the PIECE OF A GLOBE (J). Select (K).

- Solution (K1).
- Take the ENERGY BALL (L).
- Return to the Fisherman’s Hut. Receive a FISHING NET.

- Place the FISH; use the KNIFE; take FISH SCALES (M).
- Place and select the GLUE FORMULA (N).
- Place the CAULDRON OF WATER. Add the FISH SCALES (O).
- Stir (P). Add the FISHING NET for a GLUE-COVERED NET.
- Walk down.

- Place the GOLD MASK (Q). Place and select the FIXED MILLSTONE DISK (R).
- Place the GLUE-COVERED NET (S). Take a CURSED NET.
- Return to the Underground Lake.

- Place the CURSED NET (T).
- Walk left.
- Select (U-V). Select (W) and use the KNIFE.
- Use the HAMMER (W1); take the STACKING TOY.
- Walk down.

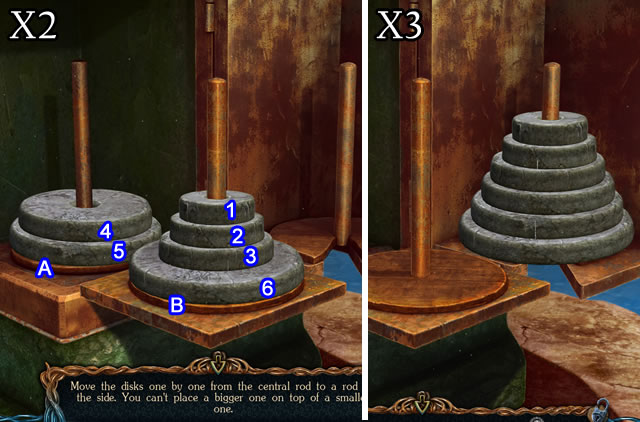
- Place the STACKING TOY (X).
- Solution (X1). (1-A)-(2-C)-(1-C)-(3-A)-(1-B)-(2-A)-(1-A)-(4-C)-(1-C)-(2-B)-(1-B)-(3-C)-(1-A)-(2-C)-(1-C)-(5-A)-(1-B)-(2-A)-(1-A)-(3-B)-(1-C)-(2-B)-(1-B)-(4-A).
- Solution (X2-X3). (1-A)-(2-C)-(1-C)-(3-A)-(1-B)-(2-A)-(1-A)-(6-C)-(1-C)-(2-B)-(1-B)-(3-C)-(1-A)-(2-C)-(1-C)-(4-B)-(1-B)-(2-A)-(1-A)-(4-B)-(1-C)-(2-B)-(1-B)-(5-C)-(1-A)-(2-C)-(1-C)-(3-A)-(1-B)-(2-A)-(1-A)-(4-C)-(1-C)-(2-B)-(1-B)-(3-C)-(1-A)-(2-C)-(1-C).

- Take the KEY PART (Y). Touch (Z1-Z2).
- Go forward.
Castle of Madness Walkthrough

- Grab the WOOD SAW (A).
- Take the STONE TILE (B).
- Take Manuscripts 23/28 (C).
- Return to the Harpy’s Nest.

- Place the STONE TILE (E).
- Take the KEY PART (F).
- Pull the lever (G).
- Play the HOP (H); receive an ENERGY BALL.
- Return to the Arena Entrance.
- Combine both KEY PARTS for a KEY (Inventory).

- Place and select the KEY (I).
- Take ATLAS’S ARM (J).
- Return to the Schooner Wreckage.
- Take the KEY from ATLAS’S ARM (Inventory).
- Use the KEY (K). Take ATLAS’S ARM (L).
- Return to the Castle of Madness.
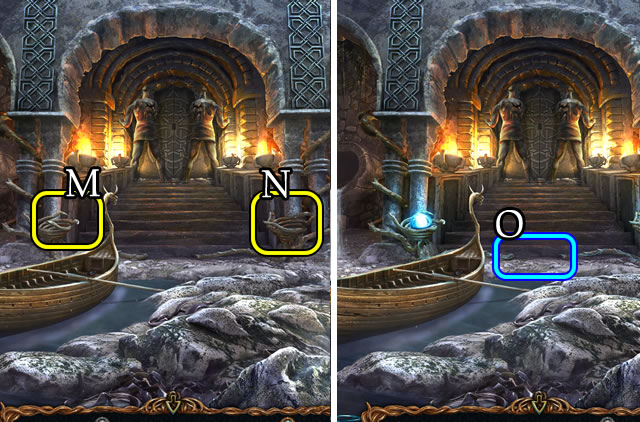
- Place each ENERGY BALL (M-N).
- Select (O).

- Solution (O1).
- Take a DIAMOND KEY from ATLAS’S ARM (Inventory).

- Place each of ATLAS’S ARMS (P).
- Walk forward.
- Take (Q), then place the PIECE OF PATTERN (R).
- Take Manuscripts 24/28 (S).

- Touch 2x (T). Take the INK FORMULA (U).
- Touch (V). Take the EVERLASTING MATCH (W).
- Touch (X).

- Take the LIPSTICK (Y).
- Place the DIAMOND KEY (Z).
- Walk right.

- Grab the SUNGLASSES (A).
- Take the LENS (B).
- Place the LIPSTICK (C).

- Solution (D).

- Solution (E). 1×2-2×10-3×6.
- Place the LENS (F).

- Touch (G-G1).
- Walk left.
- Take Manuscripts 25/28 (H).
- Grab the SPOON (I) and STONE BLOCK (J).
- Return to the Tree of Life.

- Place the STONE BLOCK (K).
- Take the EGG (L).
- Return to the Castle of Madness.
- Place the EGG (M). Use the SPOON for a BOILED EGG.
- Select the BOILED EGG (Inventory) for a peeled BOILED EGG.
- Walk forward and right.

- Select (N).
- Place the EVERLASTING MATCH and BOILED EGG (O).
- Take the CRYSTAL PYRAMID (P).
- Walk left.

- Place the CRYSTAL PYRAMID and CURSED MINOTAUR AMULET (Q).
- Take the HAND WHEEL KEY (R).
- Place the HAND WHEEL KEY (S).
- Walk forward.

- Speak to the man (T); receive DIAMONDS AND GRAINS.
- Take Manuscripts 26/28 (U).
- Take the PIECE OF THE STATUE (V) and BOTTLE OF COLOGNE (W).
- Select (X).
- Solution. 1-3-5-4-2.
- Play the HOP (Y); receive an EMPTY CARTRIDGE.
- Return to Anvil Peak.

- Speak to the blacksmith (Z); receive a METAL SAW.
- Return to the Island of Exile.
- Use the METAL SAW (A).
- Take the ‘CUBE’ TILE and KEY (B).
- Return to the Underground Lake.

- Use the KEY (C).
- Take the CORKSCREW and LEATHER ROLL (D).
- Combine the BOTTLE WITH A LETTER and CORKSCREW. Receive an EMPTY BOTTLE and NOTE (Inventory).
- Return to the Hanging Garden.

- Place the NOTE (E).
- Return to the Schooner Wreckage.
- Solution (F). 1-2-3-4-5.
- Take the TRACING PAPER (G).
- Return to Anvil Peak.

- Give the LEATHER ROLL and SUNGLASSES (H); receive a SLIDING BOLT KEY.
- Place and select the SLIDING BOLT KEY (I).
- Take the BELLOWS (J).
- Return to the Fisherman’s Hut.
- Place the DIAMONDS AND GRAINS (K).
- Slide the drawer in, then out. Take the DIAMONDS (L).
- Return to Leproch’s House.

- Take the FLASK OF BLACK PAINT (M).
- Return to the Tavern.
- Place the EMPTY BOTTLE (N), select (O) for a BOTTLE OF WINE.
- Place the INK FORMULA (P), FLASK OF BLACK PAINT (Q), BOTTLE OF WINE (R) and BOTTLE OF COLOGNE (S).

- Solution (T1-T2-T3).
- Take the INK INGREDIENTS (U).
- Return to the Labyrinth.
- Combine the EMPTY CARTRIDGE and INK INGREDIENTS for a CARTRIDGE (Inventory).

- Place the CARTRIDGE (V) and select; take the KEY.
- Place the KEY (W).
- Place, then take the TRACING PAPER (X).
- Return to the Volcanic Cavern.

- Place the TRACING PAPER (Y).
- Select (Z).
- Solution (A). 3-6-9-12-15-18-21-24.
- Take the AIR ELEMENT (B).
- Return to the Room of Insanity.

- Select (C).
- Solution (D).

- Place the AIR ELEMENT (E).
- Select 2x (F). Take the VACUUM CONTAINER.
- Return to the Lower Island.
- Place the VACUUM CONTAINER (G); receive CONES OF PARALYSIS.
- Return to the Sunken Hull.
- Place the CONES OF PARALYSIS (H).
- Use the KNIFE. Take the PEARL (I).
- Return to The Safe.

- Give the DIAMONDS and PEARL (J); receive a WHISTLE.
- Remove (K).
- Place the WHISTLE (L) and BELLOWS (M).
- Select the bellows; receive a LEVER. Select the bellows.

- Place, then select the LEVER (N).
- Take the BULL-HEAD KEY (O).
- Place, then select the BULL-HEAD KEY (P).
- Walk right.

- Take Manuscripts 27/28 (Q).
- Grab the RAIL 1/2 (R).
- Uncover and take the TRIDENT (S).
- Take the JUG OF WATER (T); use the TRIDENT.
- Open and take the TILES (U).
- Return to the Room of Riddles.

- Select (V). Place the TILES (W).
- Solution (X).
- Walk right.
- Turn the page. Take the CASKET BUTTON (Y).
- Return to the Tree of Life.
- Use the SILK HEADSCARF (Z).
- Touch (A).

- Select (B) 2x.
- Solution (B1).

- Place the CASKET BUTTON (C).
- Take the DISK KNIFE (D).
- Return to the Sunken Hull.
- Use the DISK KNIFE (E).
- Play the HOP (F) for a BENCH PIECE.
- Walk down 2x.
- Use the BENCH PIECE (G). Take METALWORKING SCISSORS (H).
- Return to the Minotaur’s Lair.
- Use the METALWORKING SCISSORS. Select for a PIECE OF THE PATTERN (I).
- Return to the Great Library.
- Take RAIL 2/2 (J).
- Place RAILS 2/2 (K).
- Select (L).

- Place the PIECE OF THE PATTERN (M) and open.
- Take the EMPTY BEAKER (N). Uncover and take Manuscripts 28/28 (O).
- Take the KEEPER’S MANUSCRIPT (P).
- Return to The Safe.

- Give the KEEPER’S MANUSCRIPT (Q).
- Return to the Minotaur’s Lair.
- Place the ROSE PETALS. Uncover and take the CURSED BULL RING (R).

- Pull the lever (S).
- Use the HAMMER (T). Take the SIGNET RING.
- Return to the Cave.

- Place the PIECE OF THE STATUE (U).
- Place and select the SIGNET RING (V).
- Take the SAPPHIRE and RUBY (W).
- Select (X). Take the EMERALD (Y).
- Return to The Safe.

- Place the SAPPHIRE, RUBY and EMERALD (Z).
- Take the JADE SKULL (A).
- Return to the Ancient Graveyard.
- Place the JADE SKULL (B).
- Select (C).

- Solution (C1-C2). (F-A)-(C-F)-(B-G)-(B-E)-(B-G)-(C-D)-(B-E)-(E-D)-(D-C)-(E-D)-(E-B).
- Take the WATER ELEMENT (D).
- Return to the Room of Insanity.

- Select (E).
- Solution (F).

- Place the WATER ELEMENT (G).
- Select (H), then take the BOOKS (I).
- Return to the Great Library.

- Place the BOOKS (J).
- Solution (K). 4-12-17.
- Play the HOP (L) for a SPELL BOOK.
- Select (M). Take the HANGING BUCKET (N).
- Walk down.
From the Grave Walkthrough

- Select (O). Place the JUG OF WATER (P).
- Take the ROPE LADDER (Q).
- Return to the Elders’ House.
- Give the SPELL BOOK (R); receive a LEVER and ELIXIR OF ANIMATION FORMULA.
- Grab the BROOM (S).
- Return to the Underground Lake.

- Use the BROOM (T).
- Break the eggs. Take the SWITCH and DRAGON-EGG SHELLS (U).
- Return to the Crossroads.
- Place and select the LEVER (V).
- Place the ROPE LADDER (W).

- Take the FULL-ECLIPSE TILE (X).
- Use the KNIFE. Uncover to place and select the SWITCH (Y).
- Return to Anvil Peak.
- Use the HANGING BUCKET for a HALF-ECLIPSE TILE (Z).
- Return to the Great Library.

- Place the HALF-ECLIPSE TILE and FULL-ECLIPSE TILE (A).
- Solution (B1-B2).

- Select (C).
- Return to Anvil Peak. Walk left.
- Play the HOP (D); receive a CROWN PIECE.
- Take the CROWN PART (E).
- Take the FATHER FIGURINE (F).
- Return to the Tree of Life.

- Place the MOTHER FIGURINE and FATHER FIGURINE (G).
- Touch (H).
- Take the TREE OF LIFE FRUIT (I).
- Return to the Elders’ House.

- Place the EMPTY BEAKER for NYMPH’S TEARS (J).
- Place the ELIXIR OF ANIMATION FORMULA (1), DRAGON-EGG SHELLS (2) and TREE OF LIFE FRUIT (3).
- Crush, then place (4) the DRAGON-EGG SHELLS.
- Place the NYMPH’S TEARS (4).
- Use the KNIFE (3). Place the TREE OF LIFE FRUIT (4).
- Cap then take the ELIXIR OF ANIMATION (K).
- Return to Leproch’s Tomb.

- Use the ELIXIR OF ANIMATION (L); receive a KEY.
- Use the KEY (M). Take CHEST OF GOLD 1/9 (N).
- Take the CURSED KEY (O).
- Use the KNIFE, take the CURSED SWORD (P).
- Use the HAMMER, take the CURSED SCEPTER (Q).
- Return to the Crossroads.

- Place and select the CURSED KEY (R). Receive CHEST OF GOLD 2/9.
- Open and take the KEY (S).
- Return to the Ruined Temple.
- Select (T) and place the KEY (U).

- Uncover and take the HANDLE (V).
- Touch (W); take the DICE (X).
- Return to the Elders’ House.

- Place the CURSED SCEPTER (Y).
- Take the GLASS PUNCHCARD (Z).
- Take (Y) for CHEST OF GOLD 3/9.
- Return to the Great Library.
- Place and select the HANDLE (A).
- Take the SPRING (B).

- Place the SPRING (C).
- Select (D).
- Take the FIRE ELEMENT (E).
- Return to the Room of Insanity.

- Select (F).
- Solution (G).

- Place the FIRE ELEMENT (H).
- Select (I) and take the PLANK (J).
- Walk forward.
- Combine the CROWN PIECE and the CROWN PART for a CROWN (Inventory).
- Place the CROWN (K). Take the STONE TABLET (L).
- Combine the STONE TABLET and HAMMER for a WOODEN PUNCHCARD.
- Return to the Minotaur’s Lair.

- Place the GLASS PUNCHCARD and WOODEN PUNCHCARD (M).
- Play the HOP (N); receive a SPREADING TOOL.
- Take CHEST OF GOLD 4/9 (O).
- Return to The Safe.

- Use the SPREADING TOOL (P).
- Select 3x (Q). Take the LENS (R).
- Return to the Harpy’s Nest.
- Place and select the LENS (S).
- Place the CURSED SWORD (T).

- Uncover and open the box. Place the DICE (U).
- Solutions are random (V).
- Take the RATCHET STRAP (W).

- Take CHEST OF GOLD 5/9 (X).
- Return to the Ruined Temple.
- Place and select the RATCHET STRAP (Y).
- Select (Z).

- Place the PLANK (A).
- Solution (A1).
- Take the ‘SANCTUARY’ TILE (B).
- Return to the Lower Island.

- Use the WOOD SAW (C); select for a ‘WOOD-NETWORK’ TILE.
- Place the ‘ANVIL’, ‘BALLISTA’, ‘METRONOME’, ‘CUBE’, ‘TOWER’, ‘SANCTUARY’ and ‘WOOD-NETWORK’ TILES (D).
- Take CHEST OF GOLD 6/9 (E).
- Return to the Hills.
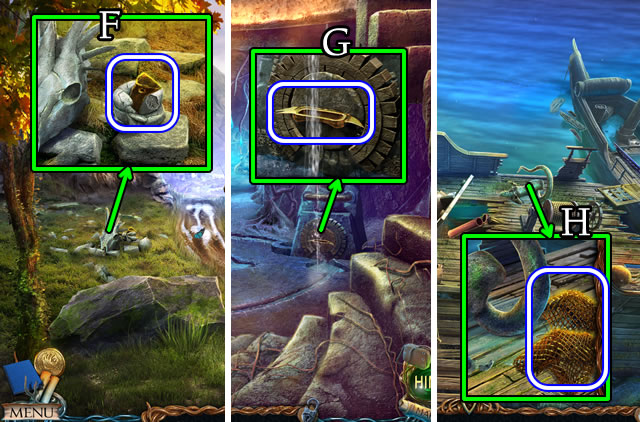
- Use the HAMMER. Take CHEST OF GOLD 7/9 (F).
- Go down the well.
- Take the CHEST OF GOLD 8/9 (G).
- Return to the Schooner Wreckage.
- Take CHEST OF GOLD 9/9 (H).
- Return to the Arena.
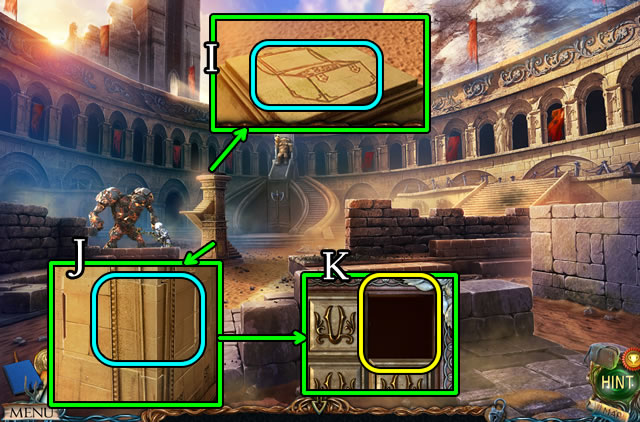
- Place the CHEST OF GOLD 9/9 (I). Receive a TILE.
- Open (J) and place the TILE (K).

- Solution (L).
- Take the KEY (M).

- Place and select the KEY (N). Take the POLE AXE (O).
- Use the POLE AXE (P); receive a GOLDEN CUP.
- Place the GOLDEN CUP (Q).
- Congratulations. You have completed playing Lost Lands: The Golden Curse.
Created at: 2015-12-06