In Lethal Company, your job is to collect abandoned industrial scraps to meet the company’s profit quota. So where can you find the external maps you need for this adventure? What do external maps contribute to you? If you need tips, you should check out our Lethal Company Outside Moon Maps guide!
Lethal Company Moons Guide
This is a collection of top-down images/maps of the exteriors of all existing satellites. We marked the ship, main entrances and fire exits; We have also included a few routes marked for specific months and additional information in our Lethal Company Outside Maps guide.
BEGINNER MOONS:
- Experimentation
- Assurance
- Vow
INTERMEDIATE MOONS:
- Offense
- March
EXPERT MOONS:
- Rend
- Dine
- Titan
41-Experimentation
Experimentation is one of the first moons that employees will encounter in Lethal Company, it is in the category of Easy moons despite having a Risk Level of “B”.
Experimentation is an abandoned industrialized moon. It features rough landscapes and dead soil. Various old machinery and decaying structures can be found all around the map. In front of the main entrance, there is a train track and an old train that stretches across the whole map. Due to the elevation of the plateau the train track is built on, it serves as a great escape spot from enemies and floods as neither can reach it.
Perpendicular to the train track runs a set of pipes which can be accessed by jumping over the railing where the fire exit is. The pipe runs all the way back to the ship which can be very useful if it becomes too dangerous to travel on the terrain below.
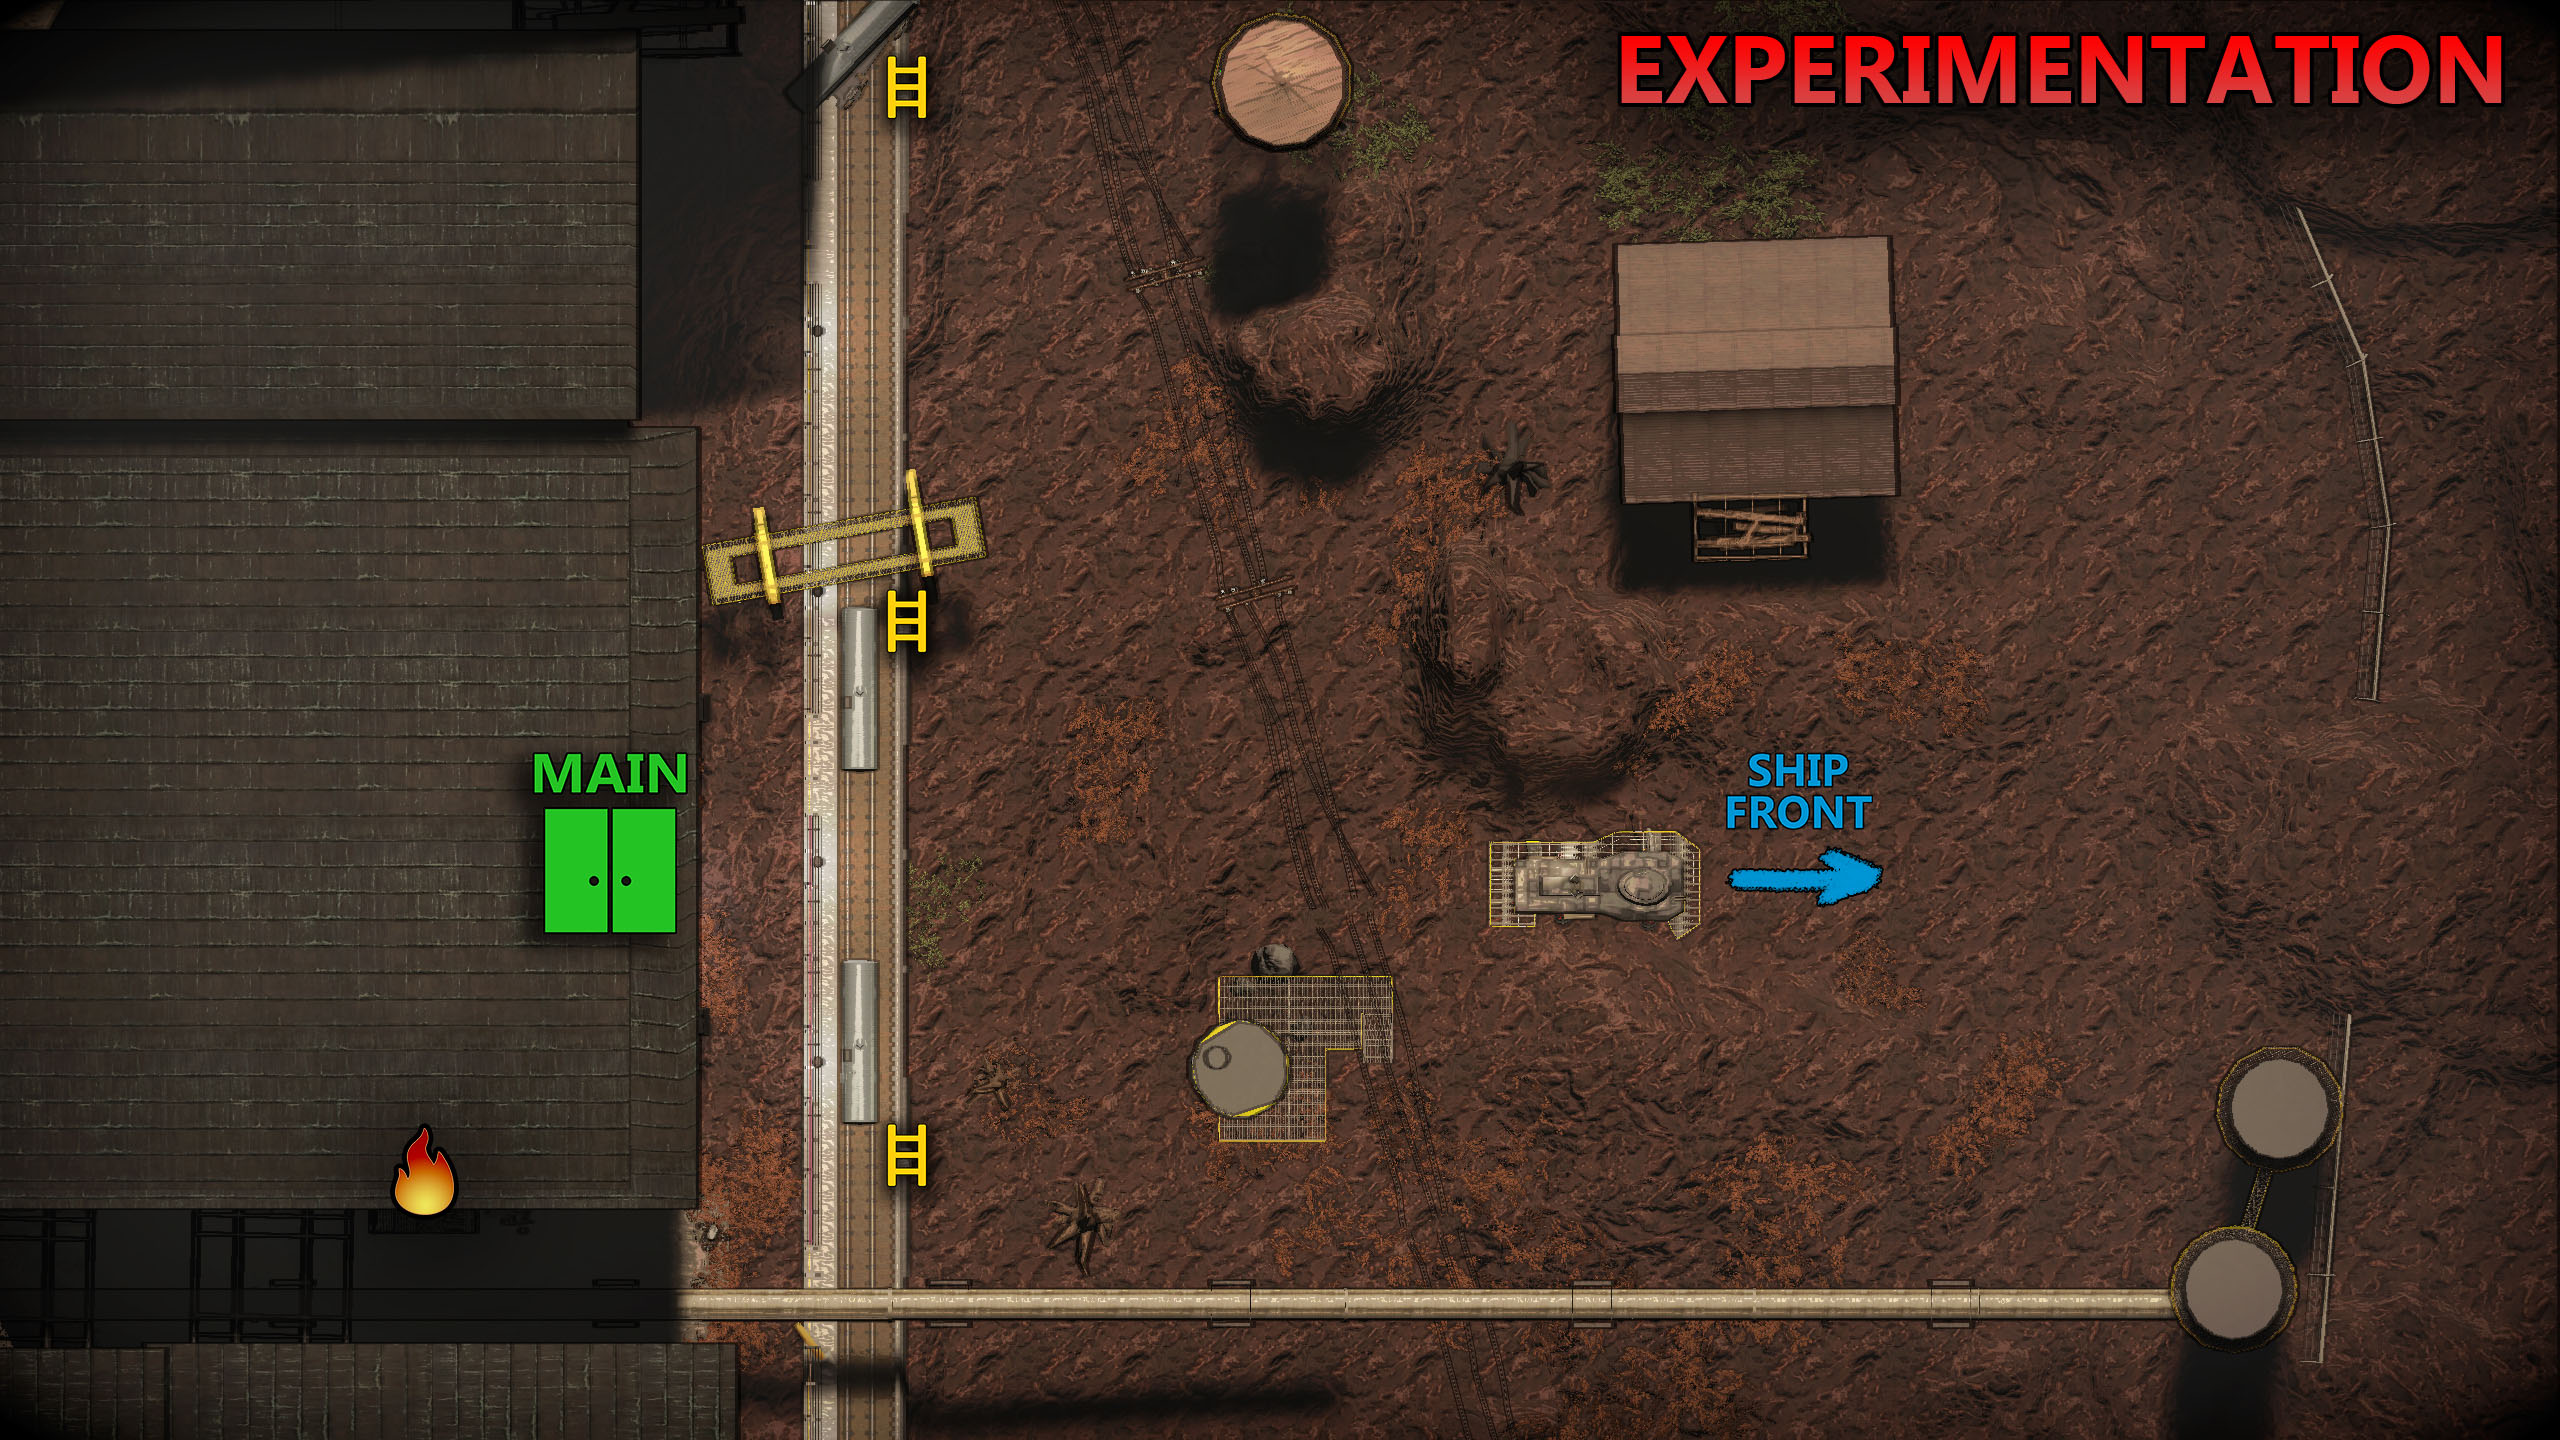
1 Main Entrance + 1 Fire Exit
The first moon you’ll likely be visiting. A good moon to start with – both the main entrance and fire exit are fairly close to the ship, and both entrances are practically right next to each other.
Dropping items off the top of the catwalk at the fire exit and off the side of the train tracks (leading to the ship) can help speed up your retrievals by a little bit.
There’s a ladder far off to the right when facing the main entrance that might come in handy, if you’re trying to avoid creatures at late periods in the day.
Stats
| Facility Size | Potential Scrap | Indoor Power | Nighttime Power | Weather |
|---|---|---|---|---|
| 1.0 | 8-11 | 4 | 8 | Rainy, Stormy, Foggy, Flooded, Eclipsed |
Loot
Apart from having the lowest possible scrap count of all moons, it also possesses the worst loot table, being heavily weighted towards heavy low-value objects like engines, axles, and metal plates. Unlike some other easy or even medium moons, however, Cash Registers and Gold Bars are capable of spawning here (with low odds).
The small saving grace of this moon looting-wise is the fact that you only have a short trip to the ship to deposit all these from either door and you get a bit more time to do it safely. It might be valid to choose Experimentation if you only need a small amount of loot to meet the next quota and all the other low-risk options are Eclipsed. If you do, make sure to try to go for as much loot as possible to make the most of the lower risk.
Enemies
The indoor enemy pool is quite nonthreatening, mostly consisting of spiders and fleas, and the low indoor power of 4 means there’s not going to be many of them. In fact, a spider spawning eats up 3 power and means there can only be 1 other enemy. However, very small spawn chances do exist for the Ghost Girl and Nutcracker to put the fear of god into any clueless intern who spends too much time blundering around here.
Unlike most moons which start spawning outdoor enemies at around 3 PM, this moon is unlikely to spawn anything until around 5 or 6. Also unlike most moons, only Eyeless Dogs and Earth Leviathans can spawn.
220-Assurance
Assurance is a moon in Lethal Company. It is the twin of Experimentation and also belongs to the Easy category. Despite being more challenging than its counterpart, it has a Risk Level of “D”. Assurance features a fire exit that is accessible without an extension ladder by jumping from on-top of the pipe next to it. The small outdoor map size and large scrap spawn rate make Assurance not only attractive for new employees but also for more experienced ones even though the moon is categorized as Easy.
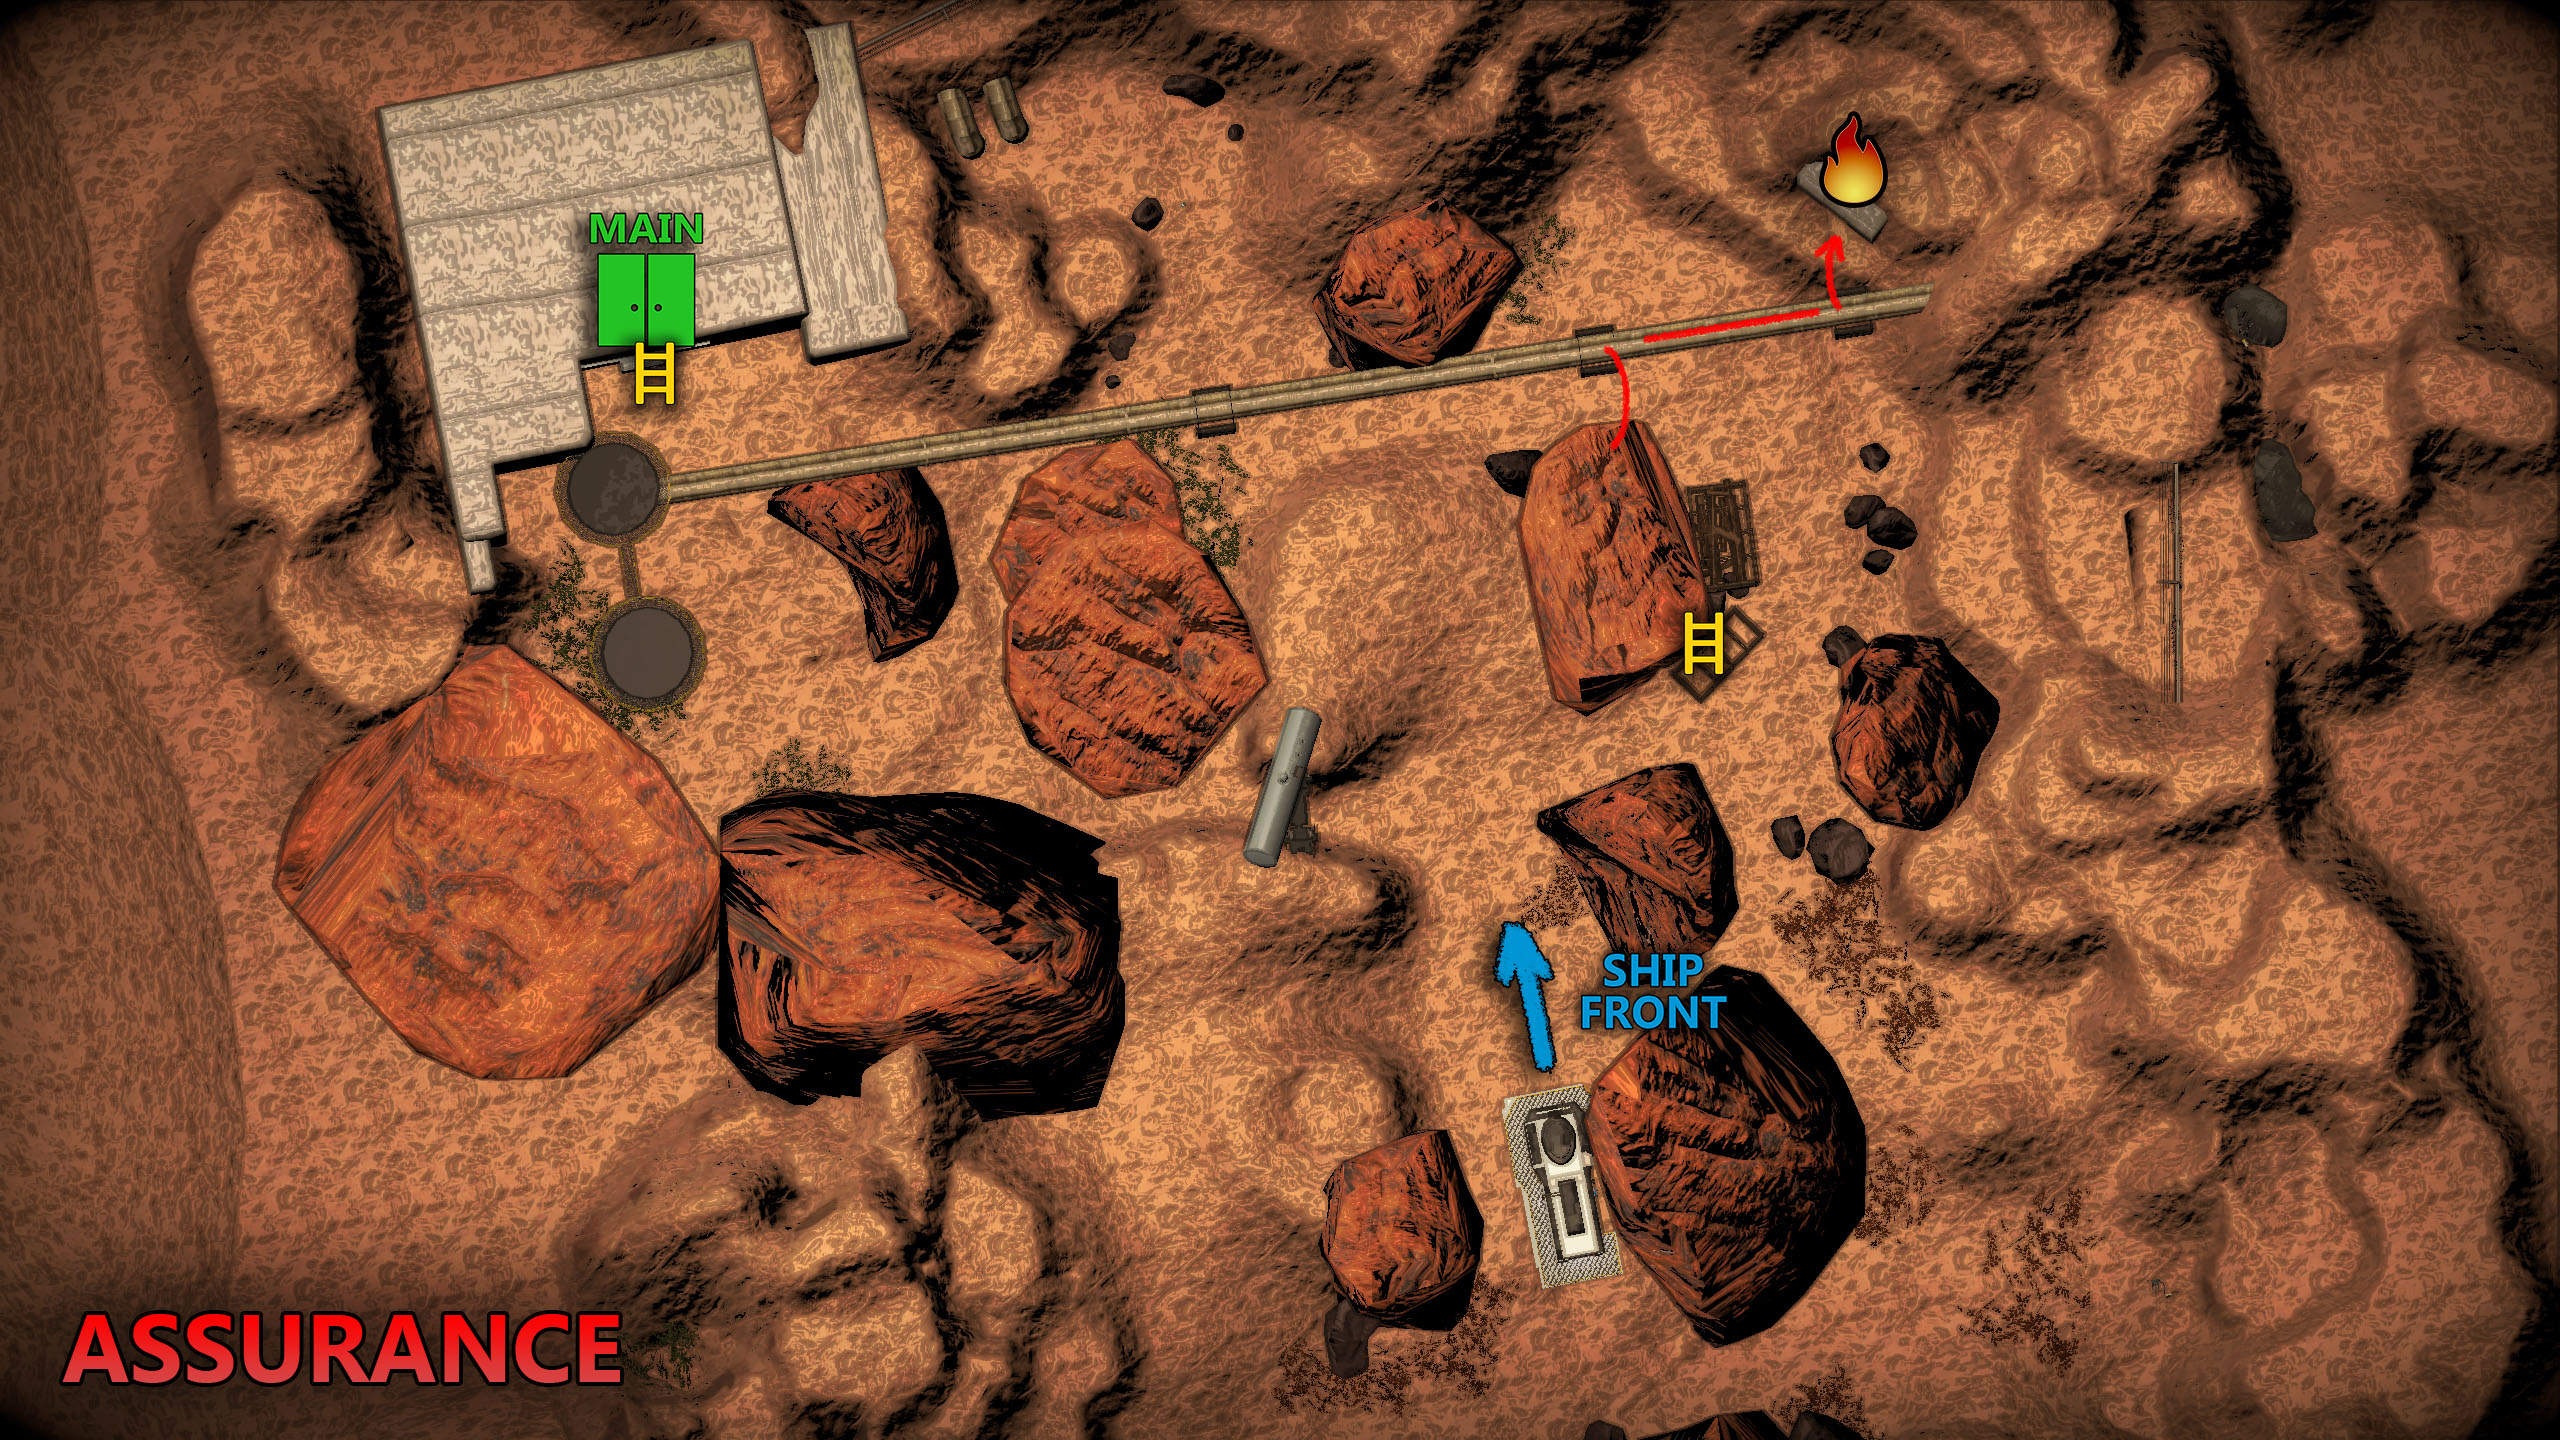
1 Main Entrance + 1 Fire Exit
A slightly longer route to take for the “beginner” moons, compared to Experimentation. The fire exit is accessible via a long ladder climb to the to the right of the ship (facing the direction of the ship), near the big rock & scaffolding. Jump across to the pipe, then to the right to the fire exit.
Like Experimentation, dropping items off the sides of the main entrance or off of the pipe by the fire exit can help speed up your retrievals a bit. I would avoid dropping items off the side of the cliff at the fire exit – there’s a chance they could get stuck along the side and be difficult to retrieve. If you need to get down quickly from the pipe, fall down along the side of the cliff and nudge your way down (think Skyrim-style cliff descending).
Stats
| Facility Size | Potential Scrap | Indoor Power | Nighttime Power | Weather |
|---|---|---|---|---|
| 1.0 | 13-16 | 6 | 8 | Rainy, Stormy, Flooded, Eclipsed |
Loot
Assurance has the best scrap-to-size ratio in the game, making it the easiest moon to find loot items.
Its actual loot pool is fairly decent for an easy moon. A fair amount of scrap is two-handed- Bottles are unusually common here (perhaps the facility used to be a bottling plant?)- but it has a better distribution of good items than Experimentation or even Offense does.
Bees can also be found here, though far less commonly than Vow and March. The lack of plant life means a good vantage point such as the pipe that leads to the fire exit can make the hives easy to spot when they do spawn.
Enemies
Assurance is absolutely lousy with Snare Fleas, Hoarding Bugs, and Bunker Spiders, in that order (pun intended). Make sure to bring a shovel, or stick close to the guy who did. Also, check your wallet every thirty seconds. The actual enemy count is not much higher than Experimentation, and the enemy spawn table is only marginally more aggressive at spawning actual threats. The Hoarding Bugs can complicate looting efforts somewhat, though a sufficiently well-armed crew can fight them off and take the hoard without too much issue.
The outdoors is mostly populated with Earth Leviathans and Eyeless Dogs, in a roughly equal split favoring the worms. The rest is accounted for by the occasional Baboon Hawk scouting party, though there is a very rare chance for a presumably very lost Forest Keeper to appear and throw a wrench into your plans.
56-Vow
Vow is a moon in Lethal Company. It belongs to the category of Easy moons alongside Experimentation and Assurance. Vow has a fire exit and two bridges, one of which can collapse under too much stress. In contrast to the other two easy moons, Vow is not a dry desert but rather features a lush forest landscape. It has a Risk Level of “C” but is a lot harder than Experimentation with its Risk Level “B”.
The rather unimpressive amount of loot that can be found here in relation to the dangers that Vow poses make it a rather unpopular choice compared to the other moons of the same category, Experimentation and Assurance that both have either more loot or are less dangerous.
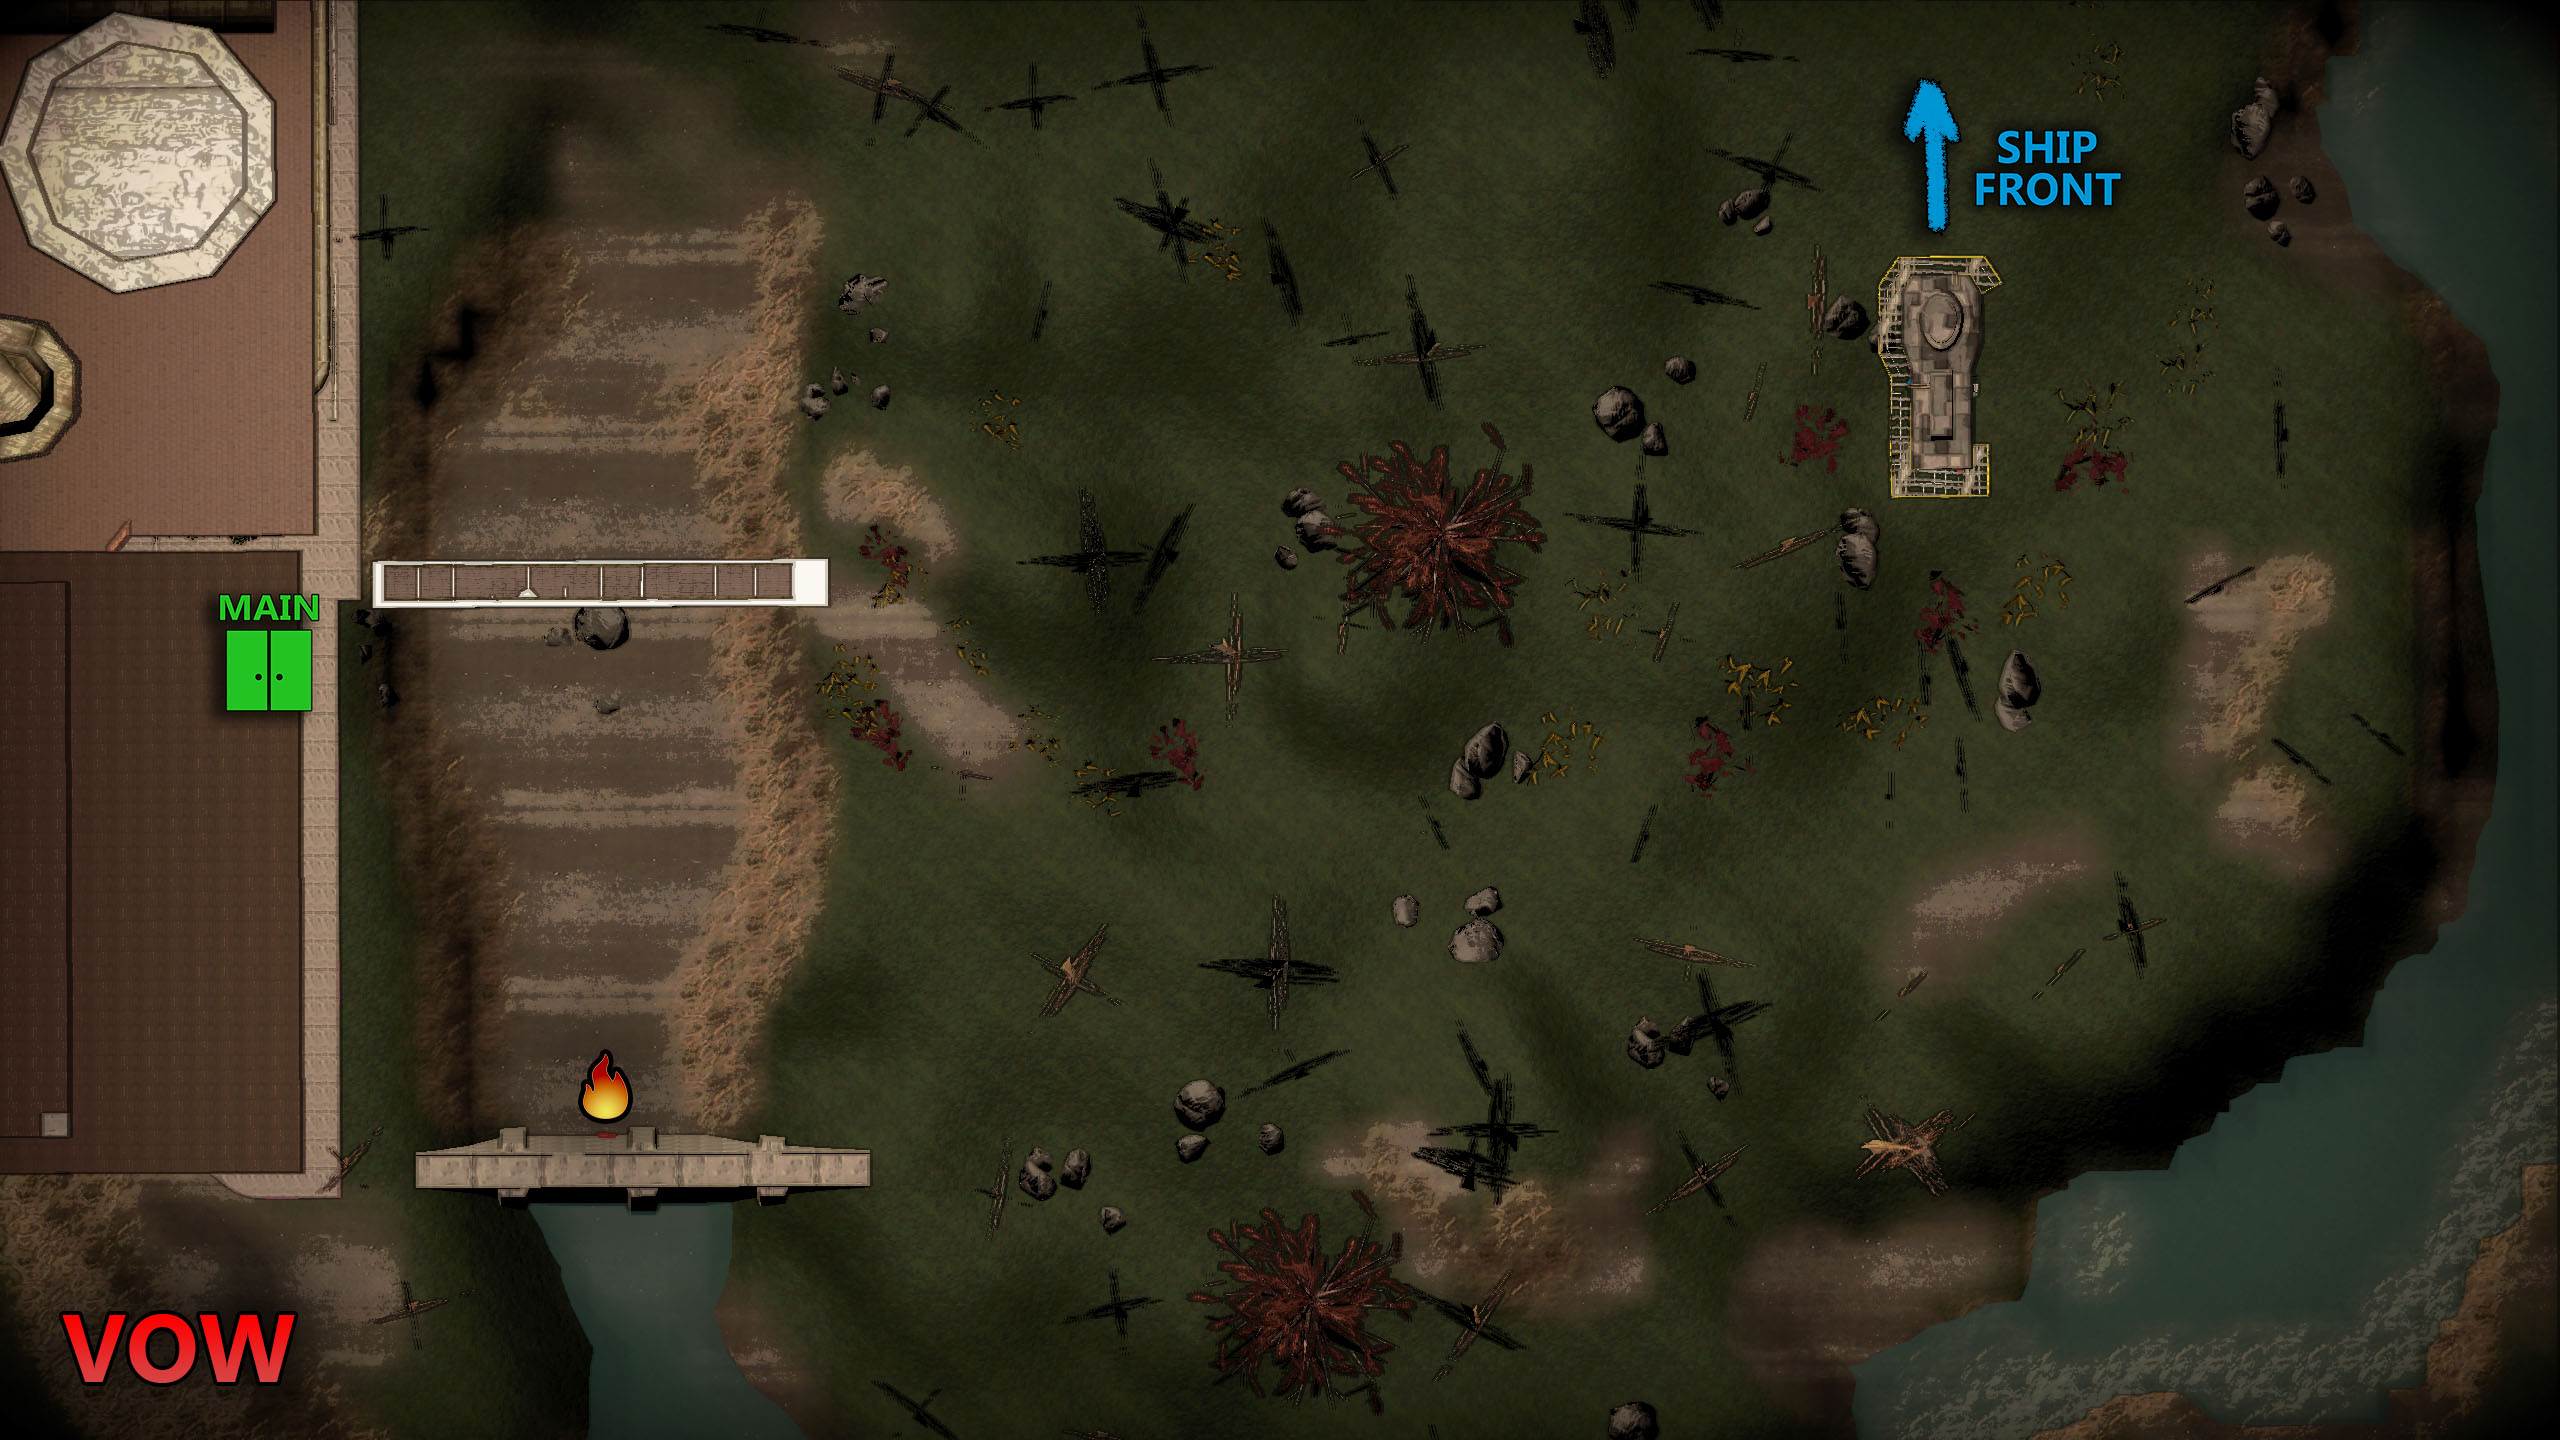
1 Main Entrance + 1 Fire Exit
The longest route to take of the “beginner” moons, and my least personal favorite out of all the moons. You do see a higher spawn rate of circuit bee hives here though since it’s a forest map, which can be lucrative – if you have a team that’s willing to go for those, that is.
Take the more central bridge to go directly to the main entrance, or slide along down the cliff near the dam bridge to get to the fire exit.
Keep your eyes peeled for any dogs / giants once it starts getting late – giants are especially dangerous on this moon. Hugging the riverside (south of the ship) may help, if you’re trying to avoid giants, since there’s a few more hills there to use as cover.
Stats
| Facility Size | Potential Scrap | Indoor Power | Nighttime Power | Weather |
|---|---|---|---|---|
| 1.15 | 10-12 | 7 | 6 | Stormy, Foggy, Flooded, Eclipsed |
Loot
Vow’s interior loot is generally less valuable in terms of both numbers and value than anything but Experimentation, but the potential for beehives can make up for this if they spawn and if someone on your team is capable of hunting them down without killing themselves.
Enemies
The Bracken is a near-guarantee indoors, with the three different bug enemies (fleas, hoarders, and spiders, in that order) following behind it in commonality. Keep your head on a swivel, stick together, and keep shovels at hand.
The outdoors will almost certainly spawn a giant (maybe more than one) once night falls. A radar booster and/or teleporter is recommended to save whoever inevitably gets grabbed.
21-Offense
Offense is a moon in Lethal Company, and has a difficulty rating of Intermediate. It has one fire exit and is the only non-snowy moon that does not support any kinds of insects. Despite having a risk rating of “B”, it is considered to be harder than Experimentation which has the same risk rating.
Offense is the only moon where the fire exit is not accessible without either an extension ladder or without performing a little bit of parkour. It is possible to jump onto the large pipe that stretches across the map during the landing phase of the ship in order to get access to the fire exit. This allows employees to visit this moon even during its dangerous eclipses at massively reduced risk of being killed. Just make sure not to fall as the sound of bones breaking might attract nearby Eyeless Dogs.
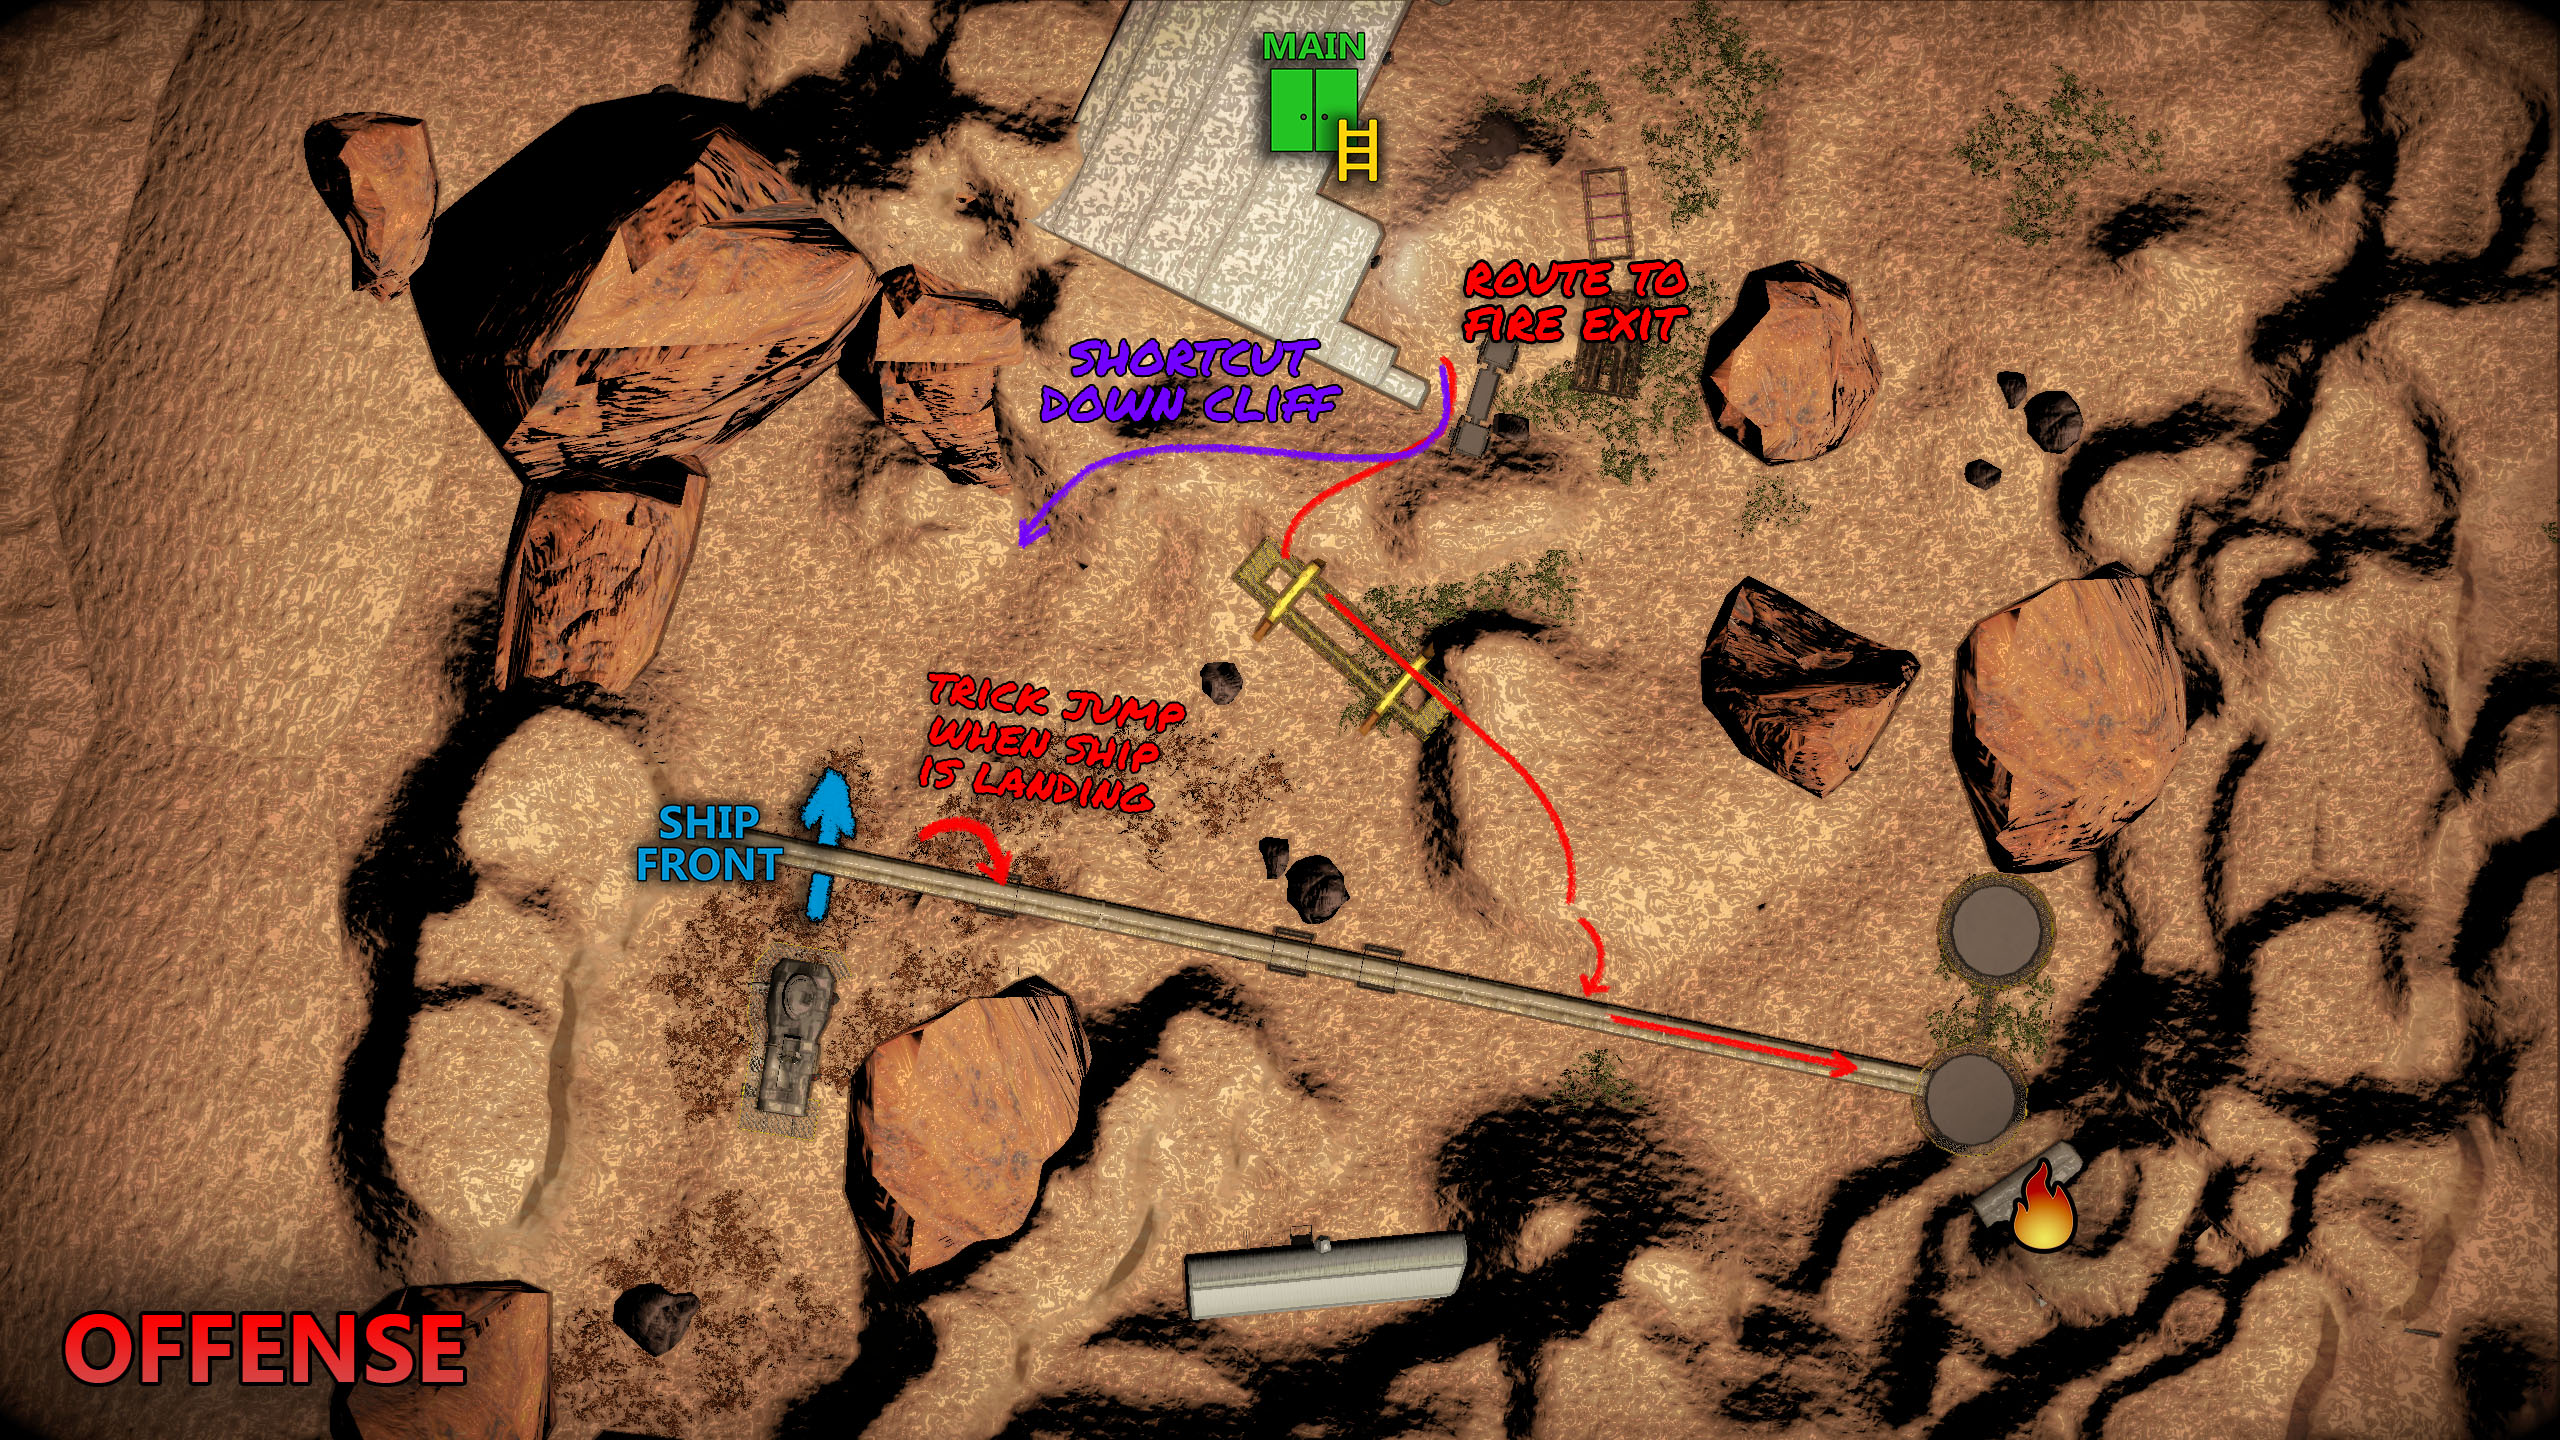
1 Main Entrance + 1 Fire Exit
Similar in route length compared to Assurance, but has overall better loot potential – as such, I prefer to go here over Assurance when possible. The route to the main entrance is fairly easy – head under the yellow crane through some bushes, then make a left and keep heading straight.
There’s a cool trick-jump you can do to quickly get on the large pipe at the start, as the ship is descending. This can save you a ton of time when going to the fire exit, if you’re confident in your parkour skillz. A jetpack can also be useful on this moon for getting onto the pipe as well – just bear in mind you can’t carry items while using one.
You can get to the fire exit normally by heading down the path to the main entrance, making a left onto and across the yellow crane, and onto a rock that leads to another jump onto the pipe. Head down the pipe to the 2 silos to find the fire exit.
To speed up your retrievals, you can drop items off from the pipe right next to the ship, if you’re coming from the fire exit – just be careful not to slip off!
Stats
| Facility Size | Potential Scrap | Indoor Power | Nighttime Power | Weather |
|---|---|---|---|---|
| 1.25 | 14-17 | 12 | 8 | Rainy, Stormy, Flooded, Eclipsed |
Loot
In a word, it’s [s]crap. Like Experimentation it loves to spawn heavy, low-value scrap metal items like metal sheets and large axles, but unlike Experimentation it can’t spawn Gold or Cash Registers. For that matter, the top-end loot in general is far less common on Offense than the danger level would imply. It technically has a higher scrap count than every other non-paid moon, but it’s only slightly, and the scrap value and density are both below average, so in practice it’s one of the least lucrative moons (keeping in mind this is before accounting for equipment loss and casualty fines).
Enemies
As the name implies, there is a lot of fighting here.
Thumpers and Spiders predominate indoors, with a chance of Snare Fleas. Brush up on your shovel-fu before entering, though don’t go completely rambo because Hygroderes and Coilheads are also present and will box you in if you’re not careful.
The outdoors is the territory of Eyeless Dogs, though there may also be Baboon Hawks who will dispute that. If you see them brawling, take advantage of it to move unnoticed, but don’t blunder into the middle of the fighting because the dogs are more than capable of eating both you and the birds at the same time. Worms can also show up a fair amount of the time, and to cap off this gigantic fracas you also have the same rare-lost-Giant chance that Assurance does.
61-March
March is a moon in Lethal Company, and has a difficulty rating of Intermediate. It is the only moon with more than one fire exit and also has the highest max daytime power while also supporting Circuit Bees which can make searching and collecting them very lucrative. March has the second largest indoor map multiplier after Titan which makes it easy to get lost inside its large labyrinths and catwalks.
It is the only moon that features permanent quick sand spots even when the weather is clear, therefore caution is advised when looking for bees or fire exits.
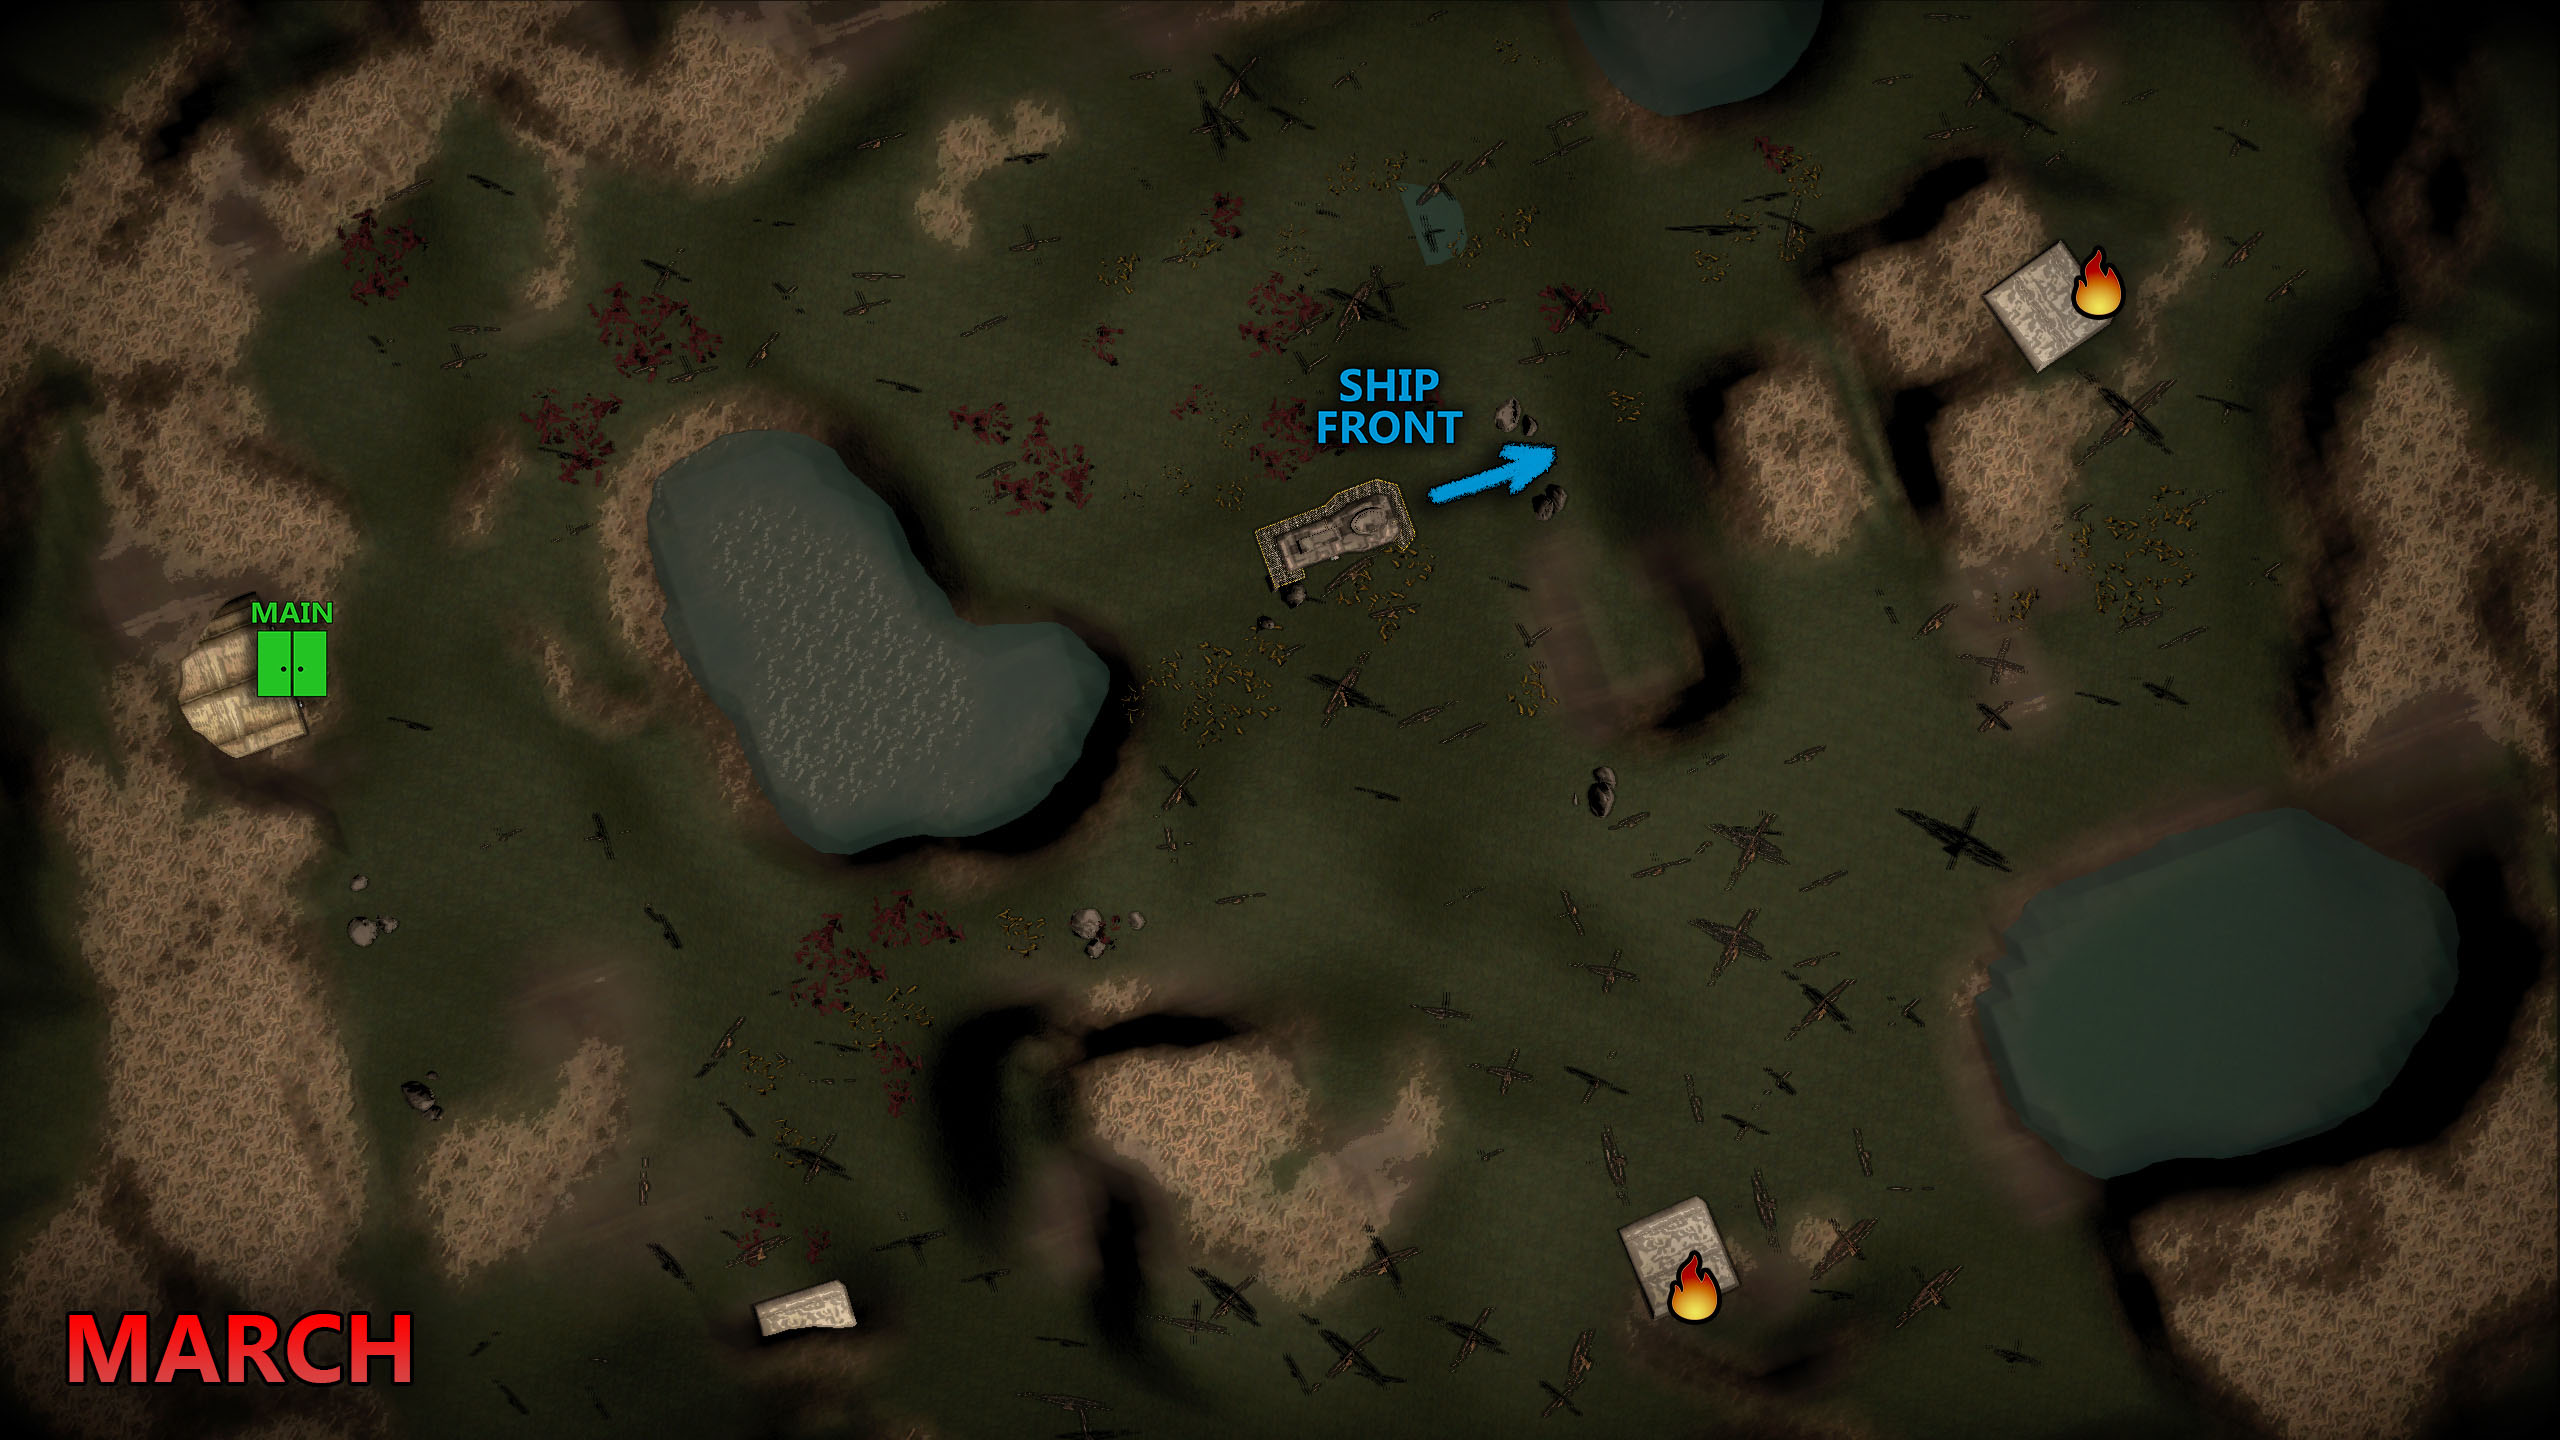
1 Main Entrance + 2 Fire Exit
The better of the 2 forest maps, in my opinion. Notably, this is the only map in the game currently that has more than 1 fire exit, which means a full team of 4 can spread out early on much more efficiently – meaning greater chances of finding loot early on in the day. Circuit bee hives are also a common sight to see here as well, making this one of the better moons to go to if you don’t have the funds to visit the more lucrative (although more deadly) moons.
That being said, you’ll still want to be mindful of travelling around the outside late in the day. Like Vow, there isn’t that much in the way of overhead cover or hills to prevent giants from tracking you down, so just be cautious when you need to.
Stats
| Facility Size | Potential Scrap | Indoor Power | Nighttime Power | Weather |
|---|---|---|---|---|
| 2.0 | 13-16 | 14 | 12 | Stormy, Foggy, Flooded, Eclipsed |
Loot
Kind of weird to talk about. The facility is huge, which theoretically means terrible scrap density, but the extra fire exits means it’s easy to systematically search the place in a much lower time than any other moon and you’re much more likely to be able to reach an exit when being chased by something awful.
Enemies
Like Offense, March is infested with Thumpers and Spiders, with a side salad of Brackens. Snare Fleas are also present so once again splitting up is dangerous, though the presence of so many fire exits makes self-rescues and shovel-less assisted saves more viable. This is also the first moon that can spawn Jesters, but thankfully it’s pretty rare (0.33%).
Due to their high spawn rate and the generous nighttime power rating, this is the only moon where you are likely to consistently see large packs of Baboon Hawks. This means you will be far more likely to encounter them in an aggressive mindset, so keep this in mind and do not travel the surface alone if you can.
85-Rend
Rend is a moon in Lethal Company, and has a difficulty rating of Hard. It is the first of three Moons that the crew needs to pay for. Rend is in a constant blizzard and compared to its snowy-moon counterpart Dine, it cannot be flooded.
The constant blizzard makes it hard to see far, so using the lamp posts as a guide to the entrance can be very helpful. The snowstorm also dampens sound which makes communication over larger distances without Walkie-Talkies hard compared to other moons, while Eyeless Dogs and Baboon Hawks can still hear you just as well.
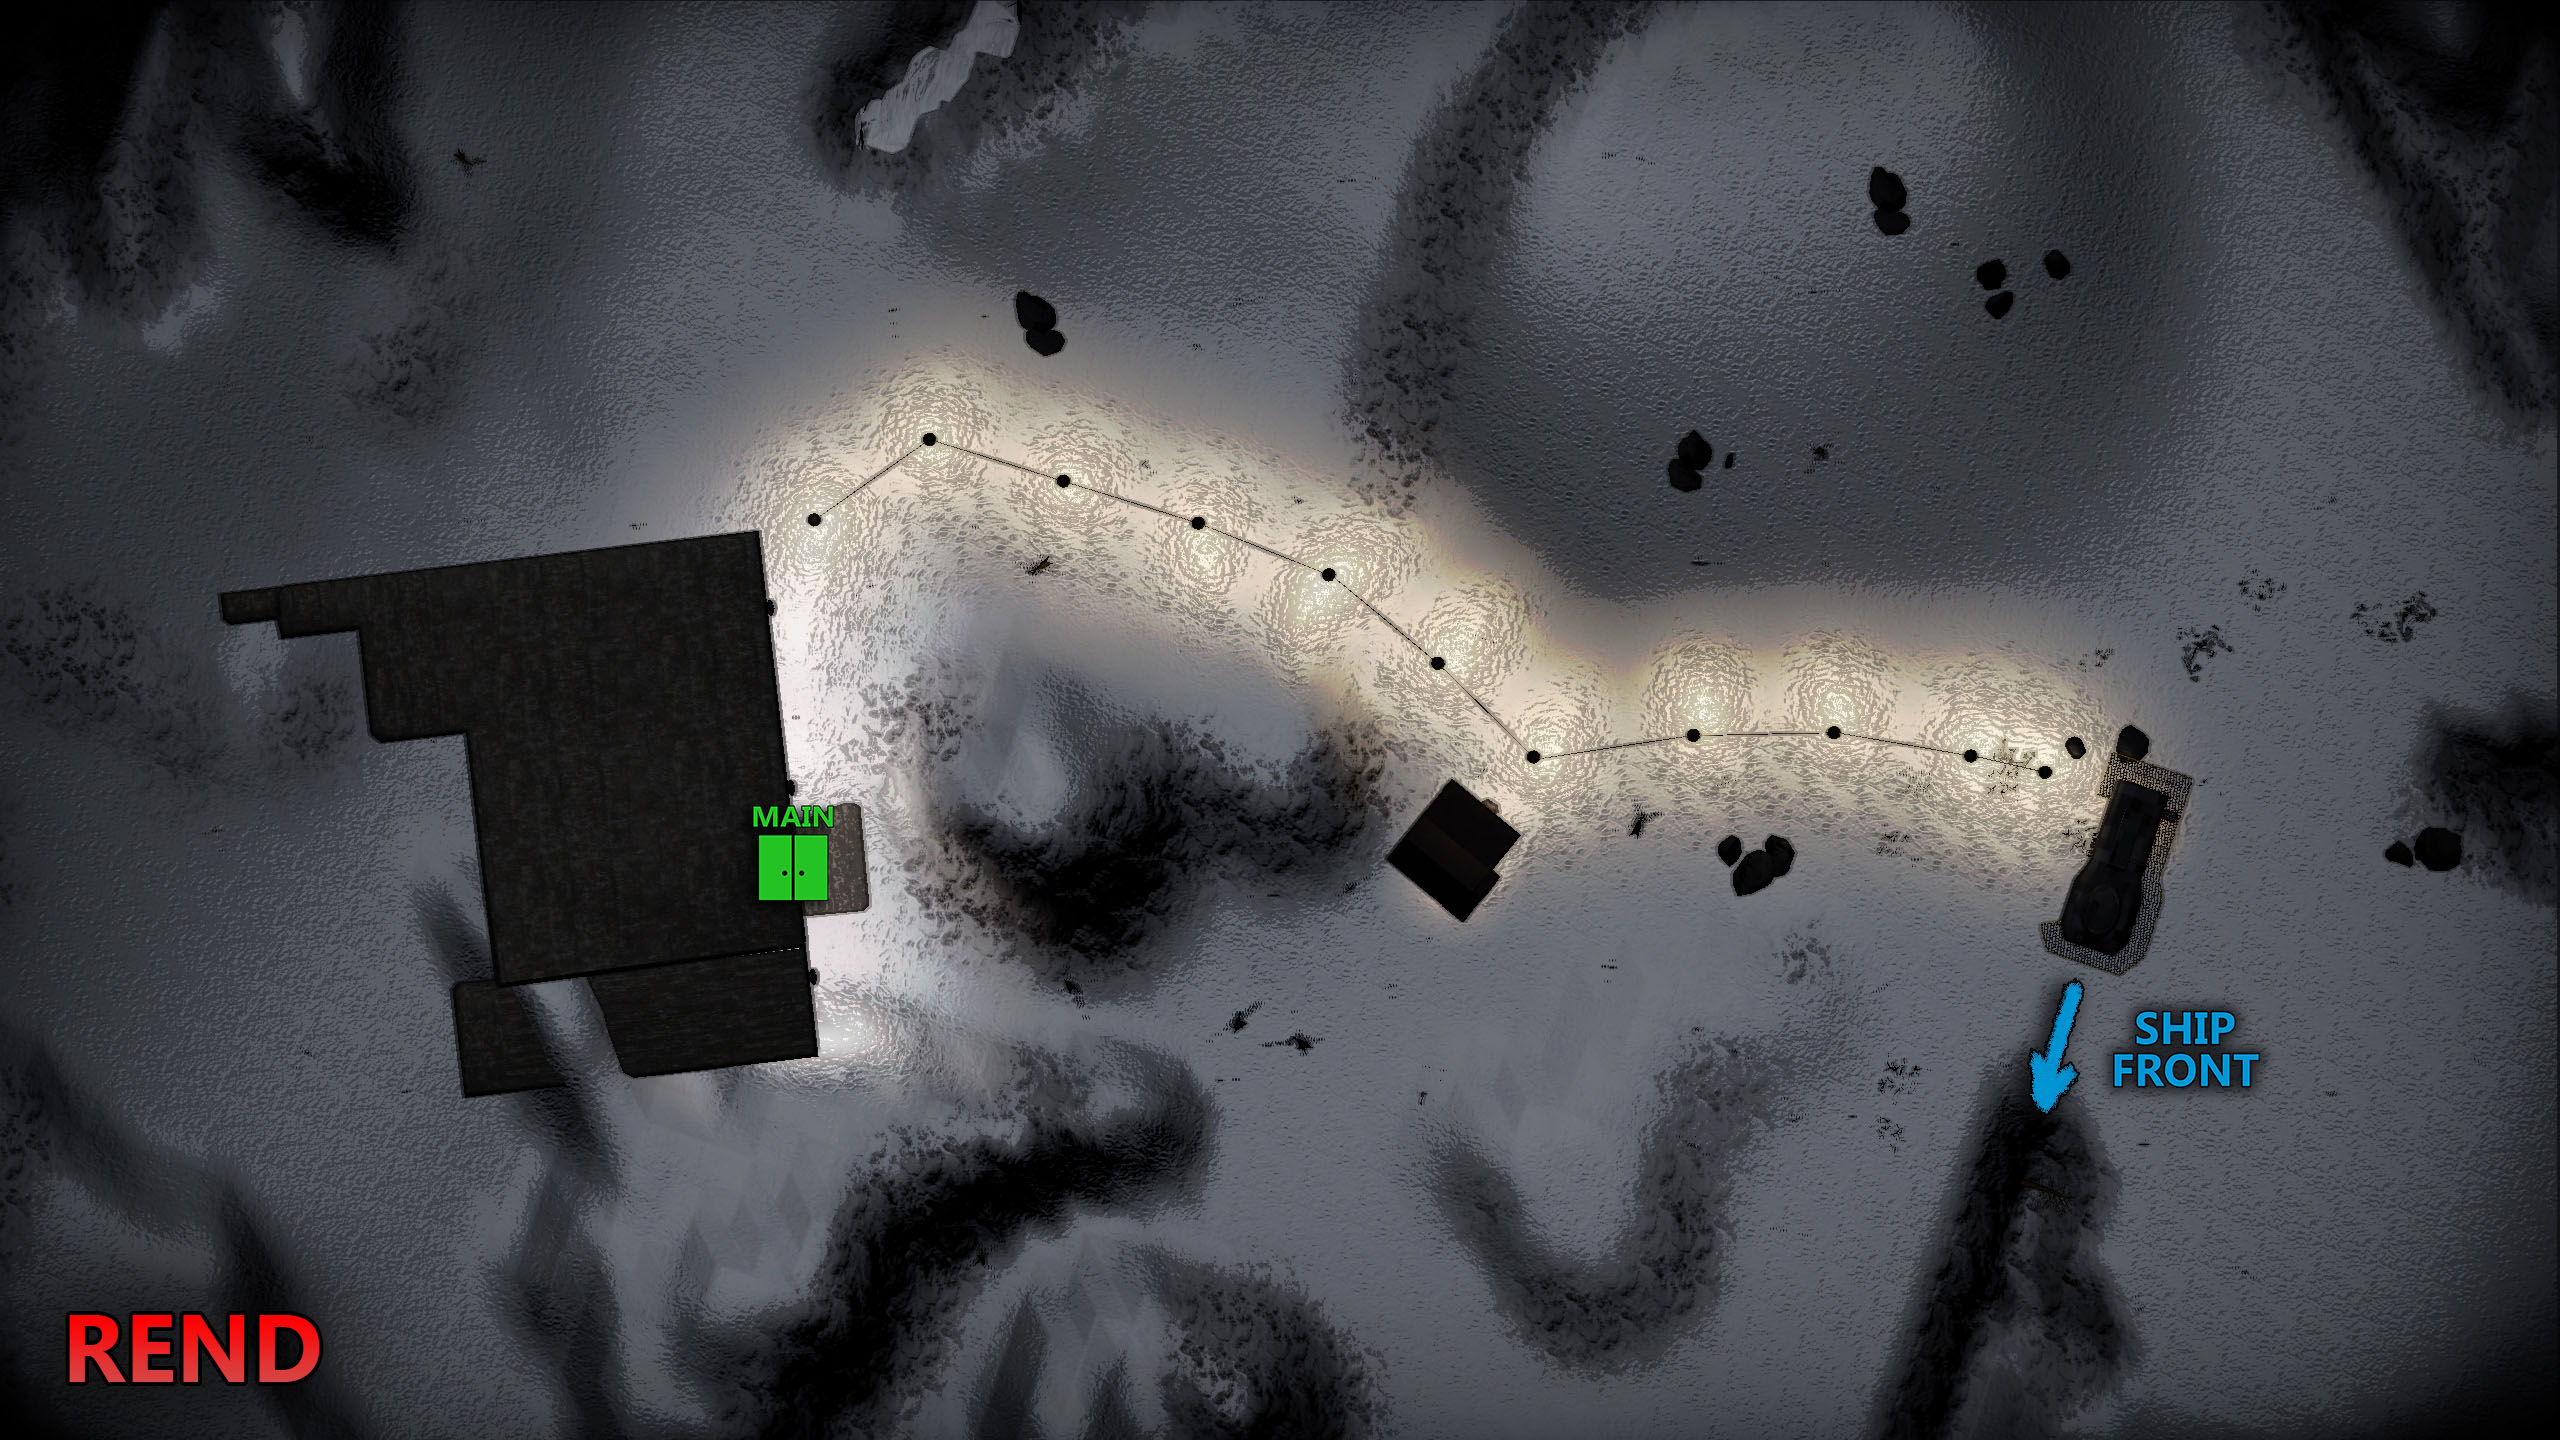
1 Main Entrance
A fairly straight-forward route, with only 1 entrance. This moon specifically features the mansion interior layout, as opposed to the facility interior of the past the moons. Loot will typically be more lucrative, but the threats are also much higher inside.
Just follow the path of lights to reach the main entrance. There’s a small, empty wooden house that might be useful for avoiding monsters late in the day, but I wouldn’t rely on this. You can also take a side path to the main entrance by following the light path to the wooden house, then heading around it to the left, hugging the large rock on your right.
Stats
| Facility Size | Potential Scrap | Indoor Power | Nighttime Power | Weather |
|---|---|---|---|---|
| 1.2 | 18-25 | 10 | 6 | Stormy, Eclipsed |
Loot
A major change from the moons you’ve seen before, the Mansion moons like to spawn lots of medium-high-value one-handed trinkets with good value-to-weight, plus the useful two-handed Fancy Lamp. The low-value scrap metal is very uncommon here, so chances are whatever you find has at least decent value overall. Possessing the smallest facility size of the paid moons makes it the best for mid-game quotas but if you are good enough you can stretch this moon fairly far due to its relative compactness and high loot density, not to mention the potential for Nutcracker farming.
Enemies
The facility is pretty dangerous, being full to the brim with Nutcrackers. However, this can work in your favor if you’re good enough to kill one with melee, since Nutcrackers are very vulnerable to Shotguns. If you can get your hands on one, it becomes progressively more viable to farm them for additional Shotguns, giving you both the ability to kill the other threats in the facility with ease as well as a substantial additional payday from the spare shotguns.
However, doing this for long periods is ill-advised due to the Jester also being a common spawn. Hang around and you will likely be forced out of the facility since Jesters are of course completely immune to damage.
Outdoors you’ll most likely see Eyeless Dogs, though them teaming up with a Giant is not at all uncommon and Worms will also sometimes appear. You won’t get too many outdoor monsters in total but the long walk between the ship and facility and the poor visibility (for you) means the outdoors is still extremely dangerous late in the day. Baboon Hawks are also completely absent.
7-Dine
Dine is a moon in Lethal Company, and has a difficulty rating of Hard. Compared to its snowy-moon counterpart Rend, Dine can actually be flooded despite being in a constant blizzard.
The constant blizzard makes it hard to see far so using the lamp posts as a guide to the entrance can be very helpful. The snowstorm also dampens sound which makes communication over larger distances hard without Walkie-talkies compared to other moons. Despite that, Eyeless Dogs and Baboon Hawks can still hear you just as well.
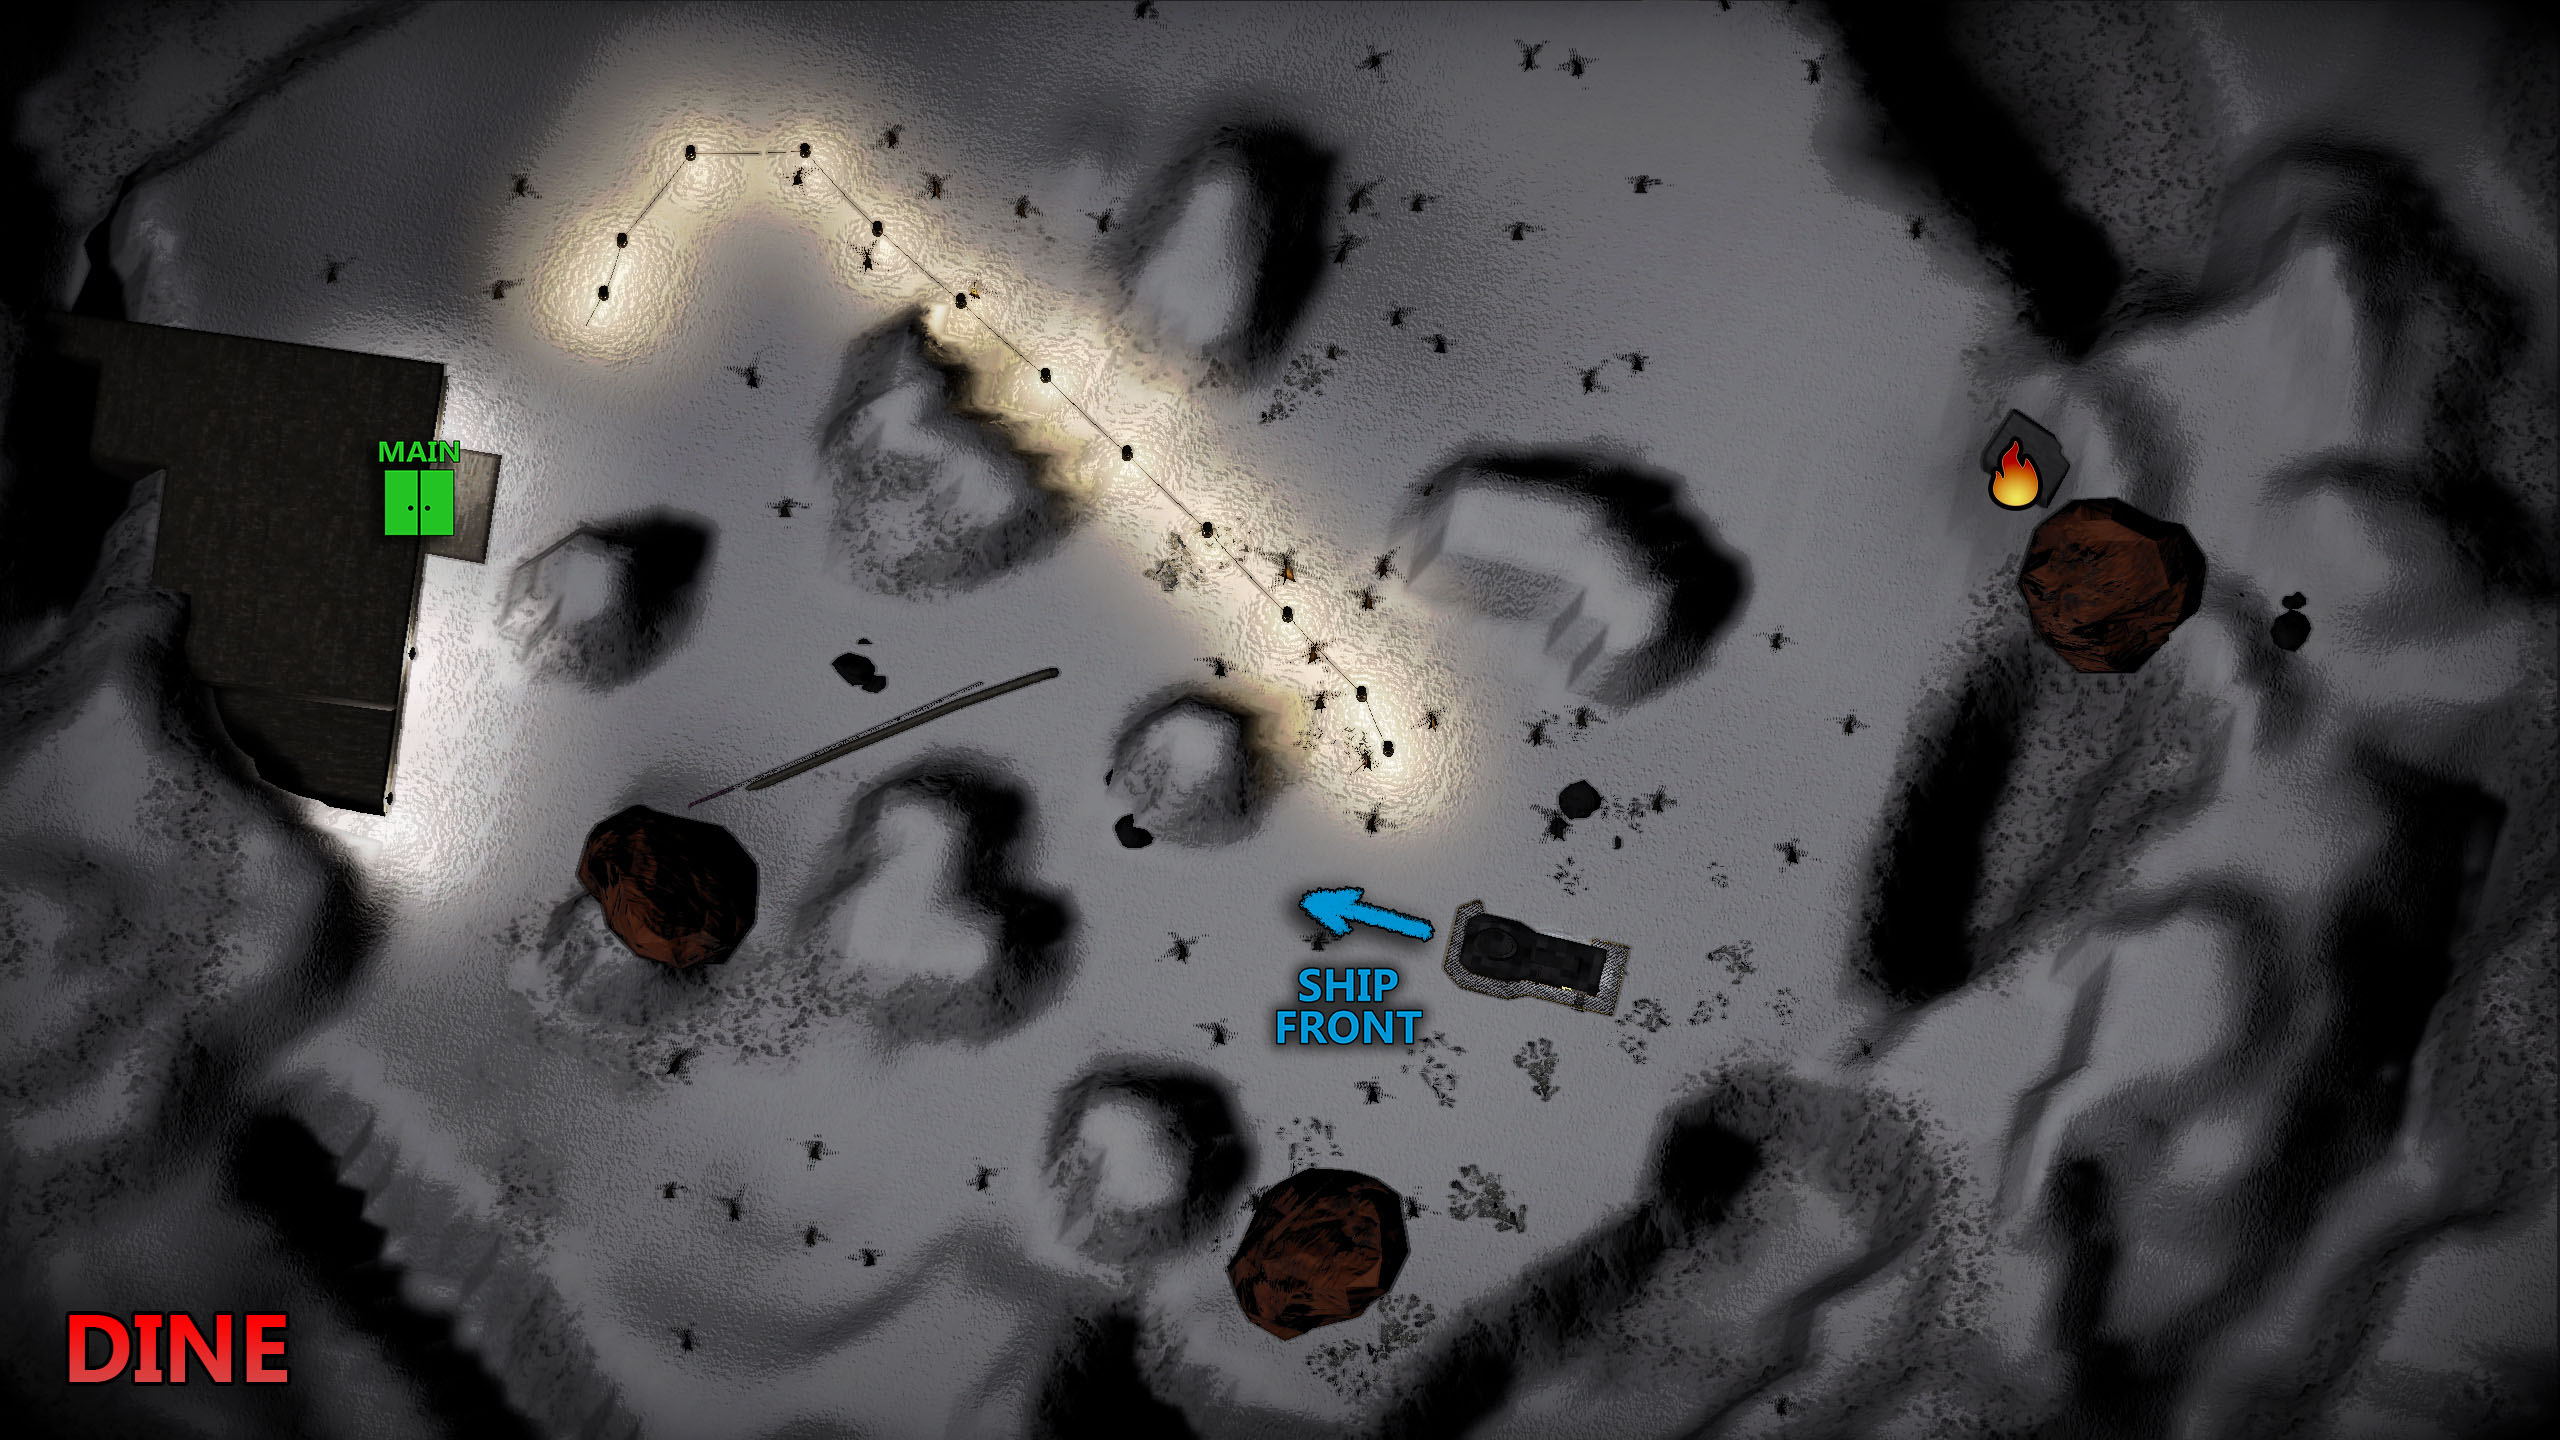
1 Main Entrance + 1 Fire Exit
Pretty much a longer version of Rend, but with a fire exit – hidden in the blizzard off to the right of the ship. Following along the path of lights will lead you to the main entrance – but you can cut down your travel time a bit by breaking off the light path to the left when you reach the large rock, midway down the path. Not much else to add here – like Rend, be mindful of monsters on your way back when it gets late in the day.
Stats
| Facility Size | Potential Scrap | Indoor Power | Nighttime Power | Weather |
|---|---|---|---|---|
| 1.3 | 20-28 | 15 | 6 | Flooded, Eclipsed |
Loot
Dine possesses a loot pool that is overall very similar to Rend, with a slightly higher loot total but also a larger facility size, meaning roughly equal loot density.
Nutcracker farming, however, is not really viable here due to their low spawn rate.
Enemies
Compared to Rend, Dine has far fewer Nutcrackers and Brackens but far more Jesters and Spiders, and unlike both other difficult moons it can’t spawn live Masked (masks themselves will however still spawn), making it generally more predictable in the interior. However, the fact that Jesters are invincible rather than simply dangerous means you’re far more likely to be completely forced out of the facility.
Outside, it features the same preference for Eyeless Dogs as Rend but trades the bias towards Giants for one for Worms. Baboon Hawks are again absent.
8-Titan
Titan is a moon in Lethal Company, and has a difficulty rating of Hard. It is the most difficult and also most lucrative moon. Outside entities start spawning earlier on this map and the outside map is also very small. Though, due to its potential to spawn a massive 38 scrap parts and its huge loot table, this moon is very popular among employees who are willing to take a risk for a generous paycheck.
Titan features by far the largest indoor layout while also having the largest indoor power count. This makes it very easy to get lost and killed by one of the many dangerous entities that Titan supports if one manages to lose track of the way back.
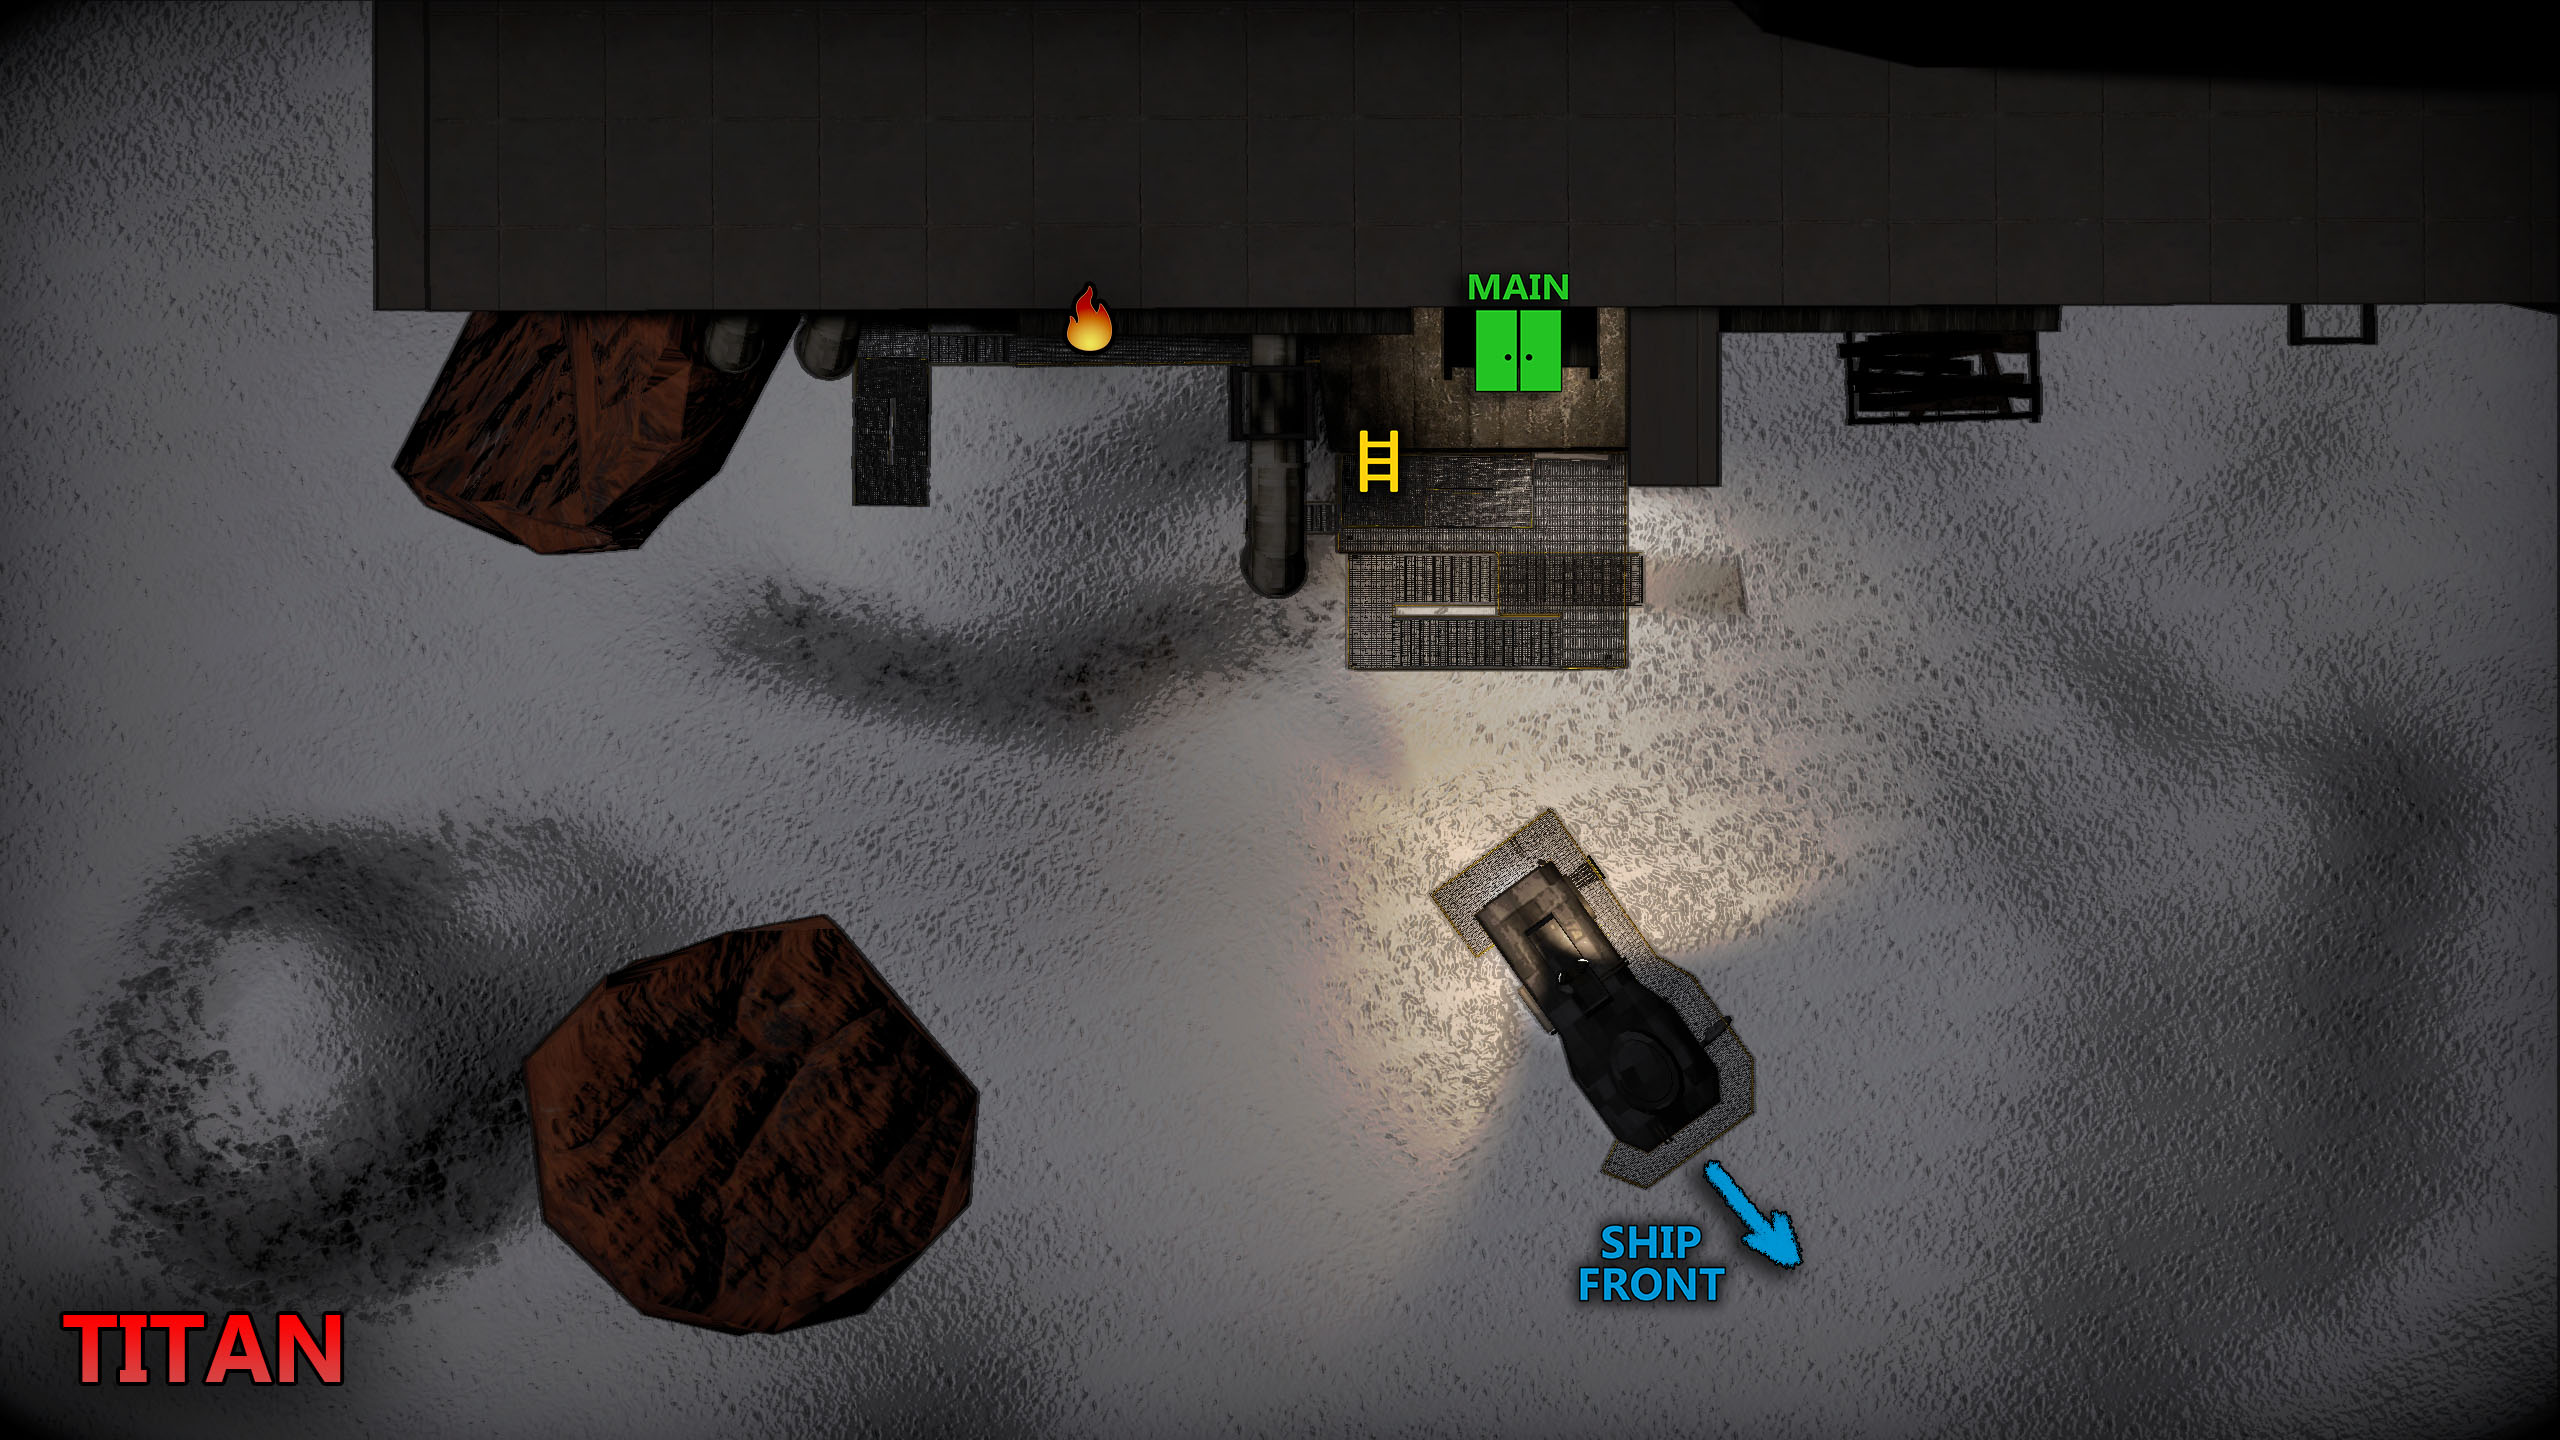
1 Main Entrance + 1 Fire Exit
The G.O.A.T. of the “expert” moons – very quick to access, with both the main entrance and fire exit right next to each other. Routing items back to your ship is also the fastest out of all the moons – as you can drop items off the sides of both down to the bottom practically right next to your ship, making retrieval times very efficient.
However, the main downside – besides Titan being the most expensive moon to visit (and the most dangerous interior on average) – is that monsters on the outside can be extremely difficult to navigate around, as they can climb up the catwalks towards the entrances. I’ve seen both giants and dogs spawn on this map – best of luck if they do end up in your way late in the day. Ideally, you should be trying to leave Titan before 3 PM, if you can help it.
Stats
| Facility Size | Potential Scrap | Indoor Power | Nighttime Power | Weather |
|---|---|---|---|---|
| 2.35 | 23-38 | 18 | 7 | Stormy, Foggy, Flooded, Eclipsed |
Loot
By far the richest moon in terms of total treasure, though with two main caveats. Firstly, while it has more total item spawns than Rend and Dine, its loot pool has a larger selection of low-value items and like Offense it actually lacks both Gold and Cash Registers (though the other high end items are more common than average to make up for this). Items are also scattered across the largest interior size of any moon in the game, meaning that Titan has the potential for the highest payout but also the highest variability of the difficult moons, to say nothing of the fact that it is also bar none the most dangerous moon in the game.
Enemies
As expected, Titan has the most aggressive interior spawns in the game and the largest interior power capacity of all moons meaning things can very quickly spiral out of control. Its spawn pool is a no-holds-barred compilation of the most dangerous enemies in the game, with Jesters, Nutcrackers, and Brackens headlining the list. It also has fairly high occurrences of both Masked and Ghost Girls, meaning that no-one and no-where is ever safe.
The exterior is a very short route due to the vertical nature of the scaffolding, but the Dogs and Giants that spawn here can both climb the scaffolds and appear right next to the doors, so this is a double-edged sword. There is also a minor chance of a worm, though the layout makes them relatively ineffective so this more of a relief than anything.
There are actually 3 fire exits on March, the last one is at the south part of the map below the lake
There is a fire exit on Rend if you go right instead of left to the main entrance. It’s marked by a lone lamp if you do a fairly wide loop to the right, or you could just fall down in the valley once you turn right.