Cyberpunk 2077 The Rescue Walkhtrough
In the wake of finishing the instructional exercise in Practice Makes Perfect, V is prepared to take on Wakako Okada’s gig. A fixer mentioned help with recovering one of her abducted customers before her inserts are taken from her body by scroungers who plan to sell them on the underground market. You must discover her, and Jackie is there to help.
Leave the vehicle and follow Jackie. Part of the way through the carport you’ll see two gross calfskin seats on the privilege with a bag between them. Take a gander at the bag to get another bit of shield.

It expects V to be level 2, however you can spare it for some other time. There are a couple of bits of garbage to a great extent as well on the off chance that you need to get a few things to sell later. Jackie shows no restraint toward you, however.
In the lift T-Bug calls with extra data about the gig. The lady V and Jackie are searching for is named Sandra Dorsett. They don’t know whether she’s as yet alive, but rather there’s expectation they made it as expected. Leave the lift and snatch the Maxdoc MK.1 to one side of the entryway. You’ll be finding a ton of these and Bounce Back MK.1 here soon. There’s a lot of garbage to be found here as well.
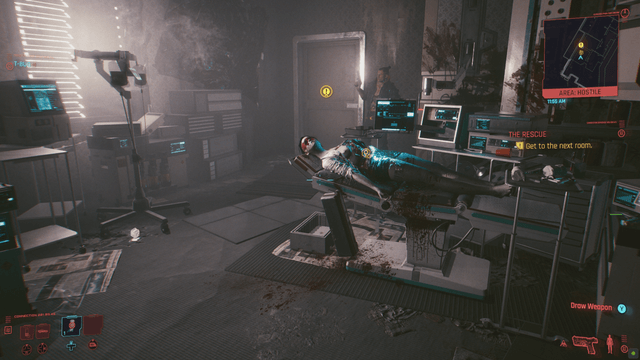
As you stroll toward the objective room, you can decide to move a lady back into her loft. It’s generally advantageous. Enter, and you’ll discover a wreck. Make certain to snatch Shards and Items as you see them spring up in the initial two rooms. In the subsequent room, however, you’ll discover a body previously collected.

This isn’t the lady you’re searching for. In the following room, hunker. Your first foe is accidentally hanging tight for his destruction by a cooler. Sneak up, get him, at that point either do a deadly or nonlethal takedown and throw him in the holder. In case you’re traveling through rapidly, don’t stress over any things you may miss. You can do a breadth on this region before you leave.
Presently, this odd restroom and kitchen combo is the place where things get precarious. Approach the opening in the divider gradually and utilize your Scanning mode to label the foes in the room. There are many. In case you’re not playing on Very Hard, you can get a little messy in this first experience. Play around with hacking (like the fan in the back!). On the off chance that you hack a foe, however, they’ll break their holding position and begin searching for you. The room they’re in has projectiles and different merchandise, so clearing it is a smart thought to begin what will probably be an enormous reserve of things.
In the event that you need to take the secrecy course, you’ll need to collaborate with Jackie to bring down the two people by the entryway. Make certain to shroud the body. At that point, you can remove a privilege from the kitchen/washroom and embrace the correct divider. You’ll discover a passage into another restroom that will lead you away from different foes. Nonetheless, a couple of headshots will take out these adversaries pretty simple, and you can take their weapons as well. On the off chance that you do decide to go weapons bursting, there are two promptly close to you and Jackie, one in the room, and two more in the back.

The disturbance will draw out the chief, and he’s pressing a quite weighty weapon. Use hacking rapidly to make an interruption (we suggest utilizing Reboot Optics. They most likely won’t shoot you on the off chance that they can’t see!) and get a few headshots in before he can begin shooting.

With the foes cleared (or in the event that you’ve snuck past them), advance toward the rear of the condo. You’ll see a work area and a way to a blue restroom. In the restroom is a tub with two bodies, one of which is the individual you’re searching for. T-Bug will walk you through the means for sparing your customer. Pull out the Shard obstructing her salvage gadget. With that unmistakable, she’s practically protected… until there’s an issue. Make certain to hit the brief to approach Jackie for the airhypo to spare Sandra. With her steady, you can walk her to the gallery where surgeons will get her.
They’re equipped surgeons however, and they’re not very attached to V. In the event that they aren’t leaving their vehicle, it implies you’re excessively near the arrival zone. Step back by the entryway and they’ll train V to put their patient on the cot. Do as such, at that point back up and hang tight for them to leave.
In our playthrough we selected to clear this loft. With everybody dealt with, V and Jackie talk about what’s next for their day. V consents to let Jackie acquire their vehicle, yet needs a lift home. While this happens make certain to clear the spaces for any garbage, Shards, ammunition, and different things. You can get the weapons off your adversaries as well. Make certain. Regardless of whether you don’t anticipate utilizing them, they’re helpful for save parts or you can sell them as-is later.
At the point when you’re prepared to leave, re-visitation of the lift. When you’re in you’ll will settle on your first decision rather than simply accepting. Follow the brief on screen to check in with Wakako about the gig. She has your cash prepared, however it doesn’t appear as though you’ll be getting it this evening. There’s a lockdown on Watson, so you’ll need to visit her later. Leave the lift and you’ll be compensated with your initial two Street Cred. Enter the front seat of your vehicle and stand by as Jackie drives you out of the carport. Another side mission will spring up called The Gig, however you’re in fact not finished with this one yet.
A calm vehicle ride home in the downpour transforms into a speedy shootout when some leftover scroungers appear. There’s a couple in the van, and a few headshots will make brisk work of the initial three. The van pulls up on the left after an it’s initial two experiences with your vehicle. Take out the driver and you won’t need to stress over shooting any others in the vehicle.
With that wreck finished with, you go to the police barricade. Brief you’re causing confusion in the roads, the other Jackie is flattering a cop. Back him up whenever you get the opportunity. While you’re here, you can likewise examine individuals and vehicles around you.
When you’re past the checkpoint, you have one last thing to see: a world class police unit taking out a couple of gangsters. After that you can utilize the catch brief on the lower base option to skirt the vehicle ride, or you can appreciate the outing. There’s very little time left to V’s condo from that point in any case. Jump out of the vehicle and you ought to procure Level 2 alongside 1 characteristic point and 1 advantage point. All that is left to do is head up to your loft. Stroll toward the lift in the carport and ride it up to your floor by choosing the loft button once inside the elevato. You’ll get a call from T-Bug in transit up. Make certain to reply! She offers you data on a netrunner program you may be keen on. Something to make sure to do later. When you arrive at your floor, follow the passage to your loft entryway, which is simply before the other door. Enter.

All that is left to do is to look at your Stash and hit the hay.